Three.js 简介
随着 HTML5 标准的颁布,以及主流浏览器的功能日益强大,直接在浏览器中展示三维图像和动画已经变得越来越容易。WebGL 技术为在浏览器中创建丰富的三维图形提供了丰富且
强大的接口,它们不仅可以创建二维图形和应用,还可以充分利用 GPU,创建漂亮的、高性能的三维应用。但是直接使用 WebGL 编程非常复杂,需要了解 WebGL 的内部细节,学习
复杂的着色器语法和足够多的数学和图形学方面的专业知识才能学好 WebGL。
Three.js 就是一款基于原生 WebGL 封装运行在浏览器中的 3D 引擎,可以用它创建各种三维场景,包括了摄影机、光影、材质等各种对象。使用 Three.js 不必学习 WebGL 的
详细细节,就能轻松创建出漂亮的三维图形。
Three.js 长短单位默认是米,时间是秒,除过相机的fov 是角度其余都是弧度
Scene
Scene 是场景对象,所有的网格对象、灯光、动画等都需要放在场景中,使用 new THREE.Scene 初始化场景,下面是场景的一些常用属性和方法。
- fog:设置场景的雾化效果,可以渲染出一层雾气,隐层远处的的物体。
Fog(color, near, far)
color: 表示雾的颜色,如设置为白色,场景中远处物体为蓝色,场景中最近处距离物体是自身颜色,最远和最近之间的物体颜色是物体本身颜色和雾颜色的混合效果。
near:表示应用雾化效果的最小距离,距离活动摄像机长度小于 near 的物体将不会被雾所影响。
far:表示应用雾化效果的最大距离,距离活动摄像机长度大于 far 的物体将不会被雾所影响。
- overrideMaterial:强制场景中所有物体使用相同材质。
- autoUpdate:设置是否自动更新。
- background:设置场景背景,默认为黑色。
- children:所有对象的列表。
- add():向场景中添加对象。
- remove():从场景中移除对象。
- getChildByName():根据名字直接返回这个对象。
- traverse():传入一个回调函数访问所有的对象。
在 react 里 使用 THREE
利用React Hooks 封装 THREE,方便使用
1
2
3
4
5
6
7
8
9
10
11
12
13
14
15
16
17
18
19
20
21
22
23
24
25
26
27
28
29
30
31
32
33
34
35
36
37
38
39
40
41
42
43
44
45
46
47
48
49
50
51
52
53
54
55
56
57
58
59
60
61
62
63
64
65
66
67
68
69
70
71
72
73
74
75
76
77
78
79
80
81
82
83
84
85
86
87
88
89
90
91
92
93
94
95
96
97
98
99
100
101
102
103
104
105
106
107
108
109
110
111
112
113
114
115
116
117
118
119
120
121
122
123
124
125
126
127
128
129
130
131
132
133
134
135
136
137
138
139
140
141
142
143
144
145
146
147
148
149
150
151
152
153
154
155
156
157
158
159
160
161
162
163
164
165
166
167
168
169
170
171
172
173
174
175
176
177
178
179
180
181
182
183
184
185
186
187
188
189
190
191
192
193
194
195
196
197
198
199
200
201
202
203
204
205
206
207
208
209
210
211
212
213
214
215
216
217
218
219
220
221
222
223
224
225
226
227
228
229
230
231
232
233
234
235
236
237
238
239
240
241
242
243
244
245
246
247
248
249
250
251
252
253
254
255
256
257
258
259
260
261
262
263
264
265
266
267
268
269
270
271
272
273
274
275
276
277
278
279
280
281
282
283
284
285
286
287
288
289
290
291
292
293
294
295
296
297
298
299
300
301
302
303
304
305
306
307
308
309
310
311
312
313
314
315
316
317
318
319
320
321
322
323
324
325
326
327
328
329
330
331
332
333
334
335
336
337
338
339
340
341
342
343
344
345
346
347
348
| import { useCallback, useEffect, useRef } from "react";
import * as THREE from "three";
import { OrbitControls } from "three/examples/jsm/controls/OrbitControls";
import _ from "lodash";
import Stats from "stats.js";
import { GUI } from "dat.gui";
export type guiChangePropertyType = { [key: string]: { name: string; min?: number; max?: number; step?: number } | { name: string; min?: number; max?: number; step?: number }[] };
function useTHREE(props: {
//画布的父容器
placeRenderingRef: React.RefObject<HTMLElement>;
//是否使用辅助轴
isUseAxes?: boolean;
//是否使用相机轨道控制器
isUseOrbitControls?: boolean;
//是否使用性能监控
isUsePerformanceMonitor?: boolean;
//是否使用辅助相机
isUseAssistCamera?: boolean;
/** dat.gui 工具可以改变的属性 */
guiChangePropertys?: guiChangePropertyType;
/** 点击画布的元素拾取 mesh */
clickHandle?: (clickMesh: (THREE.Mesh | THREE.Group)[]) => void;
/**相机轨道控制器变化了 */
orbitControlsChange?: () => void;
}) {
const renderer = useRef<THREE.WebGLRenderer>();
const scene = useRef<THREE.Scene>();
const camera = useRef<THREE.Camera>();
const assistCamera = useRef<THREE.Camera>();
const axesHelper = useRef<THREE.AxesHelper>();
const clock = useRef<THREE.Clock>();
const starts = useRef<Stats>();
const orbitControls = useRef<OrbitControls>();
const primaryAnimation = useRef<Map<string, Function>>();
useEffect(() => {
if (!props.guiChangePropertys) return;
const func = () => {
const gui = new GUI({ closed: false });
const allPropertysArr = _.keys(props.guiChangePropertys);
allPropertysArr.forEach((p) => {
const objs = p.split(",");
let object3D: THREE.Object3D | null = null;
objs.forEach((p, index) => {
try {
object3D = index === 0 ? (scene.current?.getObjectByName(p) as THREE.Object3D) : _.has(object3D, p) ? _.get(object3D, p) : (object3D?.getObjectByName(p) as THREE.Object3D);
} catch (error) {
return;
}
});
if (!object3D) return;
if (props.guiChangePropertys && _.isArray(props.guiChangePropertys[p])) {
const folder = gui.addFolder(p);
folder.open();
const obj = props.guiChangePropertys[p] as { name: string; min?: number; max?: number; step?: number }[];
obj.forEach((q) => {
if (q.name === "color") {
folder.addColor(object3D as THREE.Object3D, q.name);
} else {
if (_.isFunction(_.get(object3D, q.name))) {
const bindParameter = {
[q.name]: 0,
};
const tmp = folder.add(bindParameter, q.name, q.min, q.max, q.step).listen();
tmp.onFinishChange((value) => {
const tmp = _.get(object3D, q.name) as Function;
tmp.call(object3D, value);
});
} else folder.add(object3D as THREE.Object3D, q.name, q.min, q.max, q.step).listen();
}
});
} else {
const obj = props.guiChangePropertys && (props.guiChangePropertys[p] as { name: string; min?: number; max?: number; step?: number });
if (!obj) return;
if (obj.name === "color") {
gui.addColor(object3D as THREE.Object3D, obj.name);
} else {
if (_.isFunction(_.get(object3D, obj.name))) {
const bindParameter = {
[obj.name]: 0,
};
const tmp = gui.add(bindParameter, obj.name, obj.min, obj.max, obj.step).listen();
tmp.onFinishChange((value) => {
const tmp = _.get(object3D, obj.name) as Function;
tmp.call(object3D, value);
});
} else gui.add(object3D as THREE.Object3D, obj.name, obj.min, obj.max, obj.step).listen();
}
}
});
};
window.onload = func;
}, [props.guiChangePropertys]);
useEffect(() => {
clock.current = new THREE.Clock();
}, []);
const initStarts = useCallback((placeRenderingRef: React.RefObject<HTMLElement>) => {
var tmp = new Stats();
tmp.showPanel(0);
tmp.dom.style.position = "absolute";
tmp.dom.style.left = "0px";
tmp.dom.style.top = "0px";
placeRenderingRef.current && (placeRenderingRef.current as HTMLElement).appendChild(tmp.dom);
starts.current = tmp;
}, []);
const configCamera = useCallback((fov: number, cameraPosition: THREE.Vector3, cameraLookAt: THREE.Vector3) => {
if (camera.current instanceof THREE.PerspectiveCamera) {
(camera.current as THREE.PerspectiveCamera).fov = fov;
}
camera.current?.position.set(cameraPosition.x, cameraPosition.y, cameraPosition.z);
camera.current?.lookAt(cameraLookAt);
if (assistCamera.current instanceof THREE.PerspectiveCamera) {
(assistCamera.current as THREE.PerspectiveCamera).fov = fov;
}
assistCamera.current?.position.set(cameraPosition.x, cameraPosition.y, cameraPosition.z);
assistCamera.current?.lookAt(cameraLookAt);
}, []);
const addObjectToScene = useCallback(
(mesh: THREE.Object3D[]) =>
mesh.forEach((p) => {
scene.current && scene.current.add(p);
}),
[]
);
const addLightsToScene = useCallback(
(lights: THREE.Light[]) =>
lights.forEach((p) => {
if (p instanceof THREE.AmbientLight) {
const tmp1 = scene.current?.children.find((q) => q instanceof THREE.AmbientLight);
!tmp1 && scene.current && scene.current.add(p);
} else {
const tmp2 = scene.current?.children.find((q) => {
return _.isEqual(p.position, q.position);
});
!tmp2 && scene.current && scene.current.add(p);
}
}),
[]
);
const configPrimaryAnimation = useCallback((animation: Map<string, Function>) => {
primaryAnimation.current = animation;
}, []);
const render = useCallback(() => {
primaryAnimation.current &&
primaryAnimation.current.forEach((p) => {
p && p();
});
scene.current && camera.current && renderer.current && renderer.current?.render(scene.current, camera.current);
starts.current?.update();
requestAnimationFrame(render);
}, []);
useEffect(() => {
!camera.current && (camera.current = new THREE.PerspectiveCamera(60, window.innerWidth / window.innerHeight, 1, 10000));
!scene.current && (scene.current = new THREE.Scene());
!renderer.current &&
(renderer.current = new THREE.WebGLRenderer({
antialias: true,
}));
renderer.current && renderer.current.setClearColor("white");
renderer.current && (renderer.current.pixelRatio = window.devicePixelRatio);
const gridHelper = new THREE.GridHelper(80, 30, 0x888888, 0x888888);
gridHelper.position.set(0, 0, 0);
scene.current.add(gridHelper);
}, []);
useEffect(() => {
function onDocumentMouseDown(event: { clientX: number; clientY: number }) {
if (!camera.current || !props.placeRenderingRef.current || !scene.current) return;
let mouse = new THREE.Vector2();
let ray = new THREE.Raycaster();
const px = props.placeRenderingRef.current.getBoundingClientRect().left;
const py = props.placeRenderingRef.current.getBoundingClientRect().top;
mouse.x = ((event.clientX - px) / props.placeRenderingRef.current.offsetWidth) * 2 - 1;
mouse.y = -((event.clientY - py) / props.placeRenderingRef.current.offsetHeight) * 2 + 1;
ray.setFromCamera(mouse, camera.current);
const intersects = _.unionBy(ray.intersectObjects([...scene.current.children.filter((p) => p.type === "Mesh" || p.type === "Group")], true), "uuid");
if (intersects.length > 0) {
const meshs = intersects.filter((q) => q.object.type === "Mesh").map((q) => q.object as THREE.Mesh);
const groups = intersects.filter((q) => q.object.type === "Group").map((q) => q.object as THREE.Group);
props.clickHandle && props.clickHandle([...meshs, ...groups]);
}
}
if (props.placeRenderingRef.current && !props.placeRenderingRef.current.onclick) {
const ref = props.placeRenderingRef.current;
ref.addEventListener("click", onDocumentMouseDown);
return () => {
ref.removeEventListener("click", onDocumentMouseDown);
};
}
}, [props, props.clickHandle, props.placeRenderingRef]);
useEffect(() => {
const func = () => {
const ele = props.placeRenderingRef.current as HTMLElement;
camera.current && ((camera.current as THREE.PerspectiveCamera).aspect = window.innerWidth / window.innerHeight);
camera.current && (camera.current as THREE.PerspectiveCamera).updateProjectionMatrix();
renderer.current && (renderer.current.pixelRatio = window.devicePixelRatio);
renderer.current && renderer.current.setSize(ele.clientWidth, ele.clientHeight);
renderer.current && scene.current && camera.current && renderer.current.render(scene.current, camera.current);
};
window.addEventListener("resize", func);
return () => {
window.removeEventListener("resize", func);
};
}, [props.placeRenderingRef]);
useEffect(() => {
if (scene.current && props.isUseAssistCamera && !assistCamera.current) {
assistCamera.current = new THREE.PerspectiveCamera(60, window.innerWidth / window.innerHeight, 1, 10000);
scene.current.add(assistCamera.current);
const cameraHelper = new THREE.CameraHelper(assistCamera.current);
scene.current.add(cameraHelper);
cameraHelper.update();
}
if (scene.current && props.isUseAxes && !axesHelper.current) {
axesHelper.current = new THREE.AxesHelper(800);
scene.current.add(axesHelper.current);
}
if (renderer.current && camera.current) {
if (orbitControls.current && props.isUseOrbitControls) {
orbitControls.current.enabled = true;
return;
}
if (orbitControls.current && !props.isUseOrbitControls) {
orbitControls.current.enabled = false;
return;
}
if (!orbitControls.current && props.isUseOrbitControls) {
orbitControls.current = new OrbitControls(camera.current, renderer.current.domElement);
orbitControls.current.enableDamping = true;
orbitControls.current.addEventListener("change", (e) => {
props.orbitControlsChange && props.orbitControlsChange();
scene.current && camera.current && renderer.current && renderer.current?.render(scene.current, camera.current);
});
}
}
}, [props, props.isUseAssistCamera, props.isUseAxes, props.isUseOrbitControls, render]);
useEffect(() => {
if (renderer.current && props.placeRenderingRef.current) {
if ((props.placeRenderingRef.current as HTMLElement).childElementCount === 0) {
const ele = props.placeRenderingRef.current as HTMLElement;
renderer.current.setSize(ele.clientWidth, ele.clientHeight);
ele.appendChild(renderer.current.domElement);
}
!starts.current && props.isUsePerformanceMonitor && initStarts(props.placeRenderingRef);
}
}, [initStarts, props.isUsePerformanceMonitor, props.placeRenderingRef]);
return { configCamera, configPrimaryAnimation, addObjectToScene, addLightsToScene, camera, render, clock };
}
export default useTHREE;
|
使用自定义 hooks
自定义的 useTHREE(mainCanvas, true, true, true) hooks
需要注的是需要去除 react 的 <React.StrictMode> ,此标记是 react 用来做 hooks 副作用的并发测试,总是会重复执行 hooks 一次
1
2
3
4
5
6
7
8
9
10
11
12
13
14
15
16
17
18
19
20
21
22
23
24
25
26
27
28
29
30
31
32
33
34
35
36
37
38
39
40
41
42
43
44
45
46
47
48
49
50
51
52
53
54
55
56
57
58
59
60
61
62
63
64
65
66
67
68
69
70
71
72
73
74
75
76
77
78
79
80
81
82
83
84
85
86
87
88
89
90
91
92
93
94
95
96
97
98
99
100
101
102
103
104
105
106
107
108
| import React, { useEffect, useRef } from 'react';
import * as THREE from "three";
import { MathUtils, Vector3 } from 'three';
import useTHREE from './myHooks'
import './App.css';
const changePropertys: guiChangePropertyType = {
'mesh1,position': [
{ name: 'x', min: -10, max: 10, step: .01 },
{ name: 'y', min: -10, max: 10, step: .01 },
{ name: 'z', min: -10, max: 10, step: .01 }],
'mesh1,scale': [
{ name: 'x', step: .01 },
{ name: 'y', step: .01 },
{ name: 'z', step: .01 }],
'mesh1': [
{ name: 'rotateX', min: -Math.PI, max: Math.PI, step: 1 },
{ name: 'rotateY', min: -Math.PI, max: Math.PI, step: 1 },
{ name: 'rotateZ', min: -Math.PI, max: Math.PI, step: 1 },
{ name: 'translateX', min: -10, max: 10, step: 0.1 },
{ name: 'translateY', min: -10, max: 10, step: 0.1 },
{ name: 'translateZ', min: -10, max: 10, step: 0.1 },
{ name: 'visible', },
],
'mesh1,material':
{ name: 'color' },
}
function App() {
const mainCanvas = useRef(null)
const { configCamera, configPrimaryAnimation, addObjectToScene, addLightsToScene, camera, render, clock } =
useTHREE({
placeRenderingRef: mainCanvas,
isUseAxes:true,
isUseOrbitControls: true,
isUsePerformanceMonitor:true,
guiChangePropertys: changePropertys,
clickHandle: (clickMesh => {
clickMesh.forEach(console.log)
},
orbitControlsChange: () => {}
});
useEffect(() => {
configCamera(60, new Vector3(5, 5, 5), new Vector3(0, 0, 0));
const box = new THREE.BoxGeometry(1, 1, 1);
const material = new THREE.MeshLambertMaterial(
{ color: 0x00ffff, transparent: true, opacity: 0.5, wireframe: false, side: THREE.DoubleSide });
const mesh = new THREE.Mesh(box, material);
mesh.name='mesh1'
addObjectToScene([mesh]);
const ambientLight = new THREE.AmbientLight('white', 0.6);
const pointLight = new THREE.PointLight('white', 0.1)
pointLight.position.set(1, 20, 30)
addLightsToScene([ambientLight, pointLight]);
configPrimaryAnimation(new Map<string, Function>([["a1", () => mesh.rotateX(MathUtils.degToRad(1))]]))
}, [addLightsToScene, configPrimaryAnimation, configCamera, addObjectToScene])
useEffect(() => {
if (!mainCanvas.current) return
render();
}, [render])
const changeFov=(fov:number)=>{
(camera.current as THREE.PerspectiveCamera).fov = fov;
(camera.current as THREE.PerspectiveCamera)?.updateProjectionMatrix()
}
return (
<div className="App">
{/* 画布要设置大小 */}
<div ref={mainCanvas} style={{width:'90rem',height:'40rem',border:'2px solid blue'}}/>
</div>
);
}
export default App;
|
光源
threejs 渲染的真实性和光源的使用有很大的关系,THREE.Light 光源的基类。
threejs 在光源上常见的种类:
THREE.AmbientLight 环境光,处于多次漫反射的形成的光,这种光任何几何体的都能够照射到,没有方向性,所以不会产生阴影效果,光的强度在任何地方都一样的,不会衰减。
主要是均匀整体改变Threejs物体表面的明暗效果,这一点和具有方向的光源不同,比如点光源可以让物体表面不同区域明暗程度不同。
THREE.DirectionalLight 平行光(方向光) 可以看做是模拟太阳发出的光源,这个光源所发出的光都是相互平行的。光的强度在照射的范围内是一样的,不会产生阴影效果
平行光顾名思义光线平行,对于一个平面而言,平面不同区域接收到平行光的入射角一样。
点光源因为是向四周发散,所以设置好位置属性.position就可以确定光线和物体表面的夹角,对于平行光而言,主要是确定光线的方向,光线方向设定好了,光线的与物体表面入射角就确定了,
仅仅设置光线位置是不起作用的。
在三维空间中为了确定一条直线的方向只需要确定直线上两个点的坐标即可,所以Threejs平行光提供了位置.position和目标.target两个属性来一起确定平行光方向。目标.target的属性
值可以是Threejs场景中任何一个三维模型对象,比如一个网格模型Mesh,这样Threejs计算平行光照射方向的时候,会通过自身位置属性.position和.target表示的物体的位置属性.position计算出来。
THREE.SpotLight 聚灯光,类似于射灯,在照射的中心很亮,边缘区域很暗,有阴影效果
聚光源可以认为是一个沿着特定方会逐渐发散的光源,照射范围在三维空间中构成一个圆锥体。通过属性.angle可以设置聚光源发散角度,聚光源照射方向设置和平行光光源一样
是通过位置.position和目标.target两个属性来实现。
THREE.PointLight 点光源就像生活中的白炽灯,光线沿着发光核心向外发散,同一平面的不同位置与点光源光线入射角是不同的,点光源照射下,同一个平面不同区域是呈现出不同的明暗效果。
和环境光不同,环境光不需要设置光源位置,而点光源需要设置位置属性.position,光源位置不同,物体表面被照亮的面不同,远近不同因为衰减明暗程度不同。
仅仅使用环境光的情况下,你会发现整个立方体没有任何棱角感,这是因为环境光只是设置整个空间的明暗效果。如果需要立方体渲染要想有立体效果,需要使用具有方向性的点光源、平行光源等。
光线线是和几何体的法线和材质有关系
- MeshBasicMaterial 光线影响几何体的明暗,不会影响颜色的反射。这种材质不会反射光线
- MeshLambertMaterial 材质的法线和颜色都会影响光线,这种材质会反射光线,环境光和法线没有关系,是整体的变亮或变暗,带有方向的光源受法线影响
如果光线是红色的,几何体是绿色,显示的效果是几何体是黑色的,因为几何体吸收的是除过绿色的其他光
点,线,三角面,几何体
THREE 所有的几何体都是通过 THREE.BufferAttribute THREE.BufferGeometry 俩个API 生成的
在 R125版本开始移除了THREE.Geometry,代码被移到 three/examples/jsm/deprecated/Geometry 里
顶点位置数据渲染
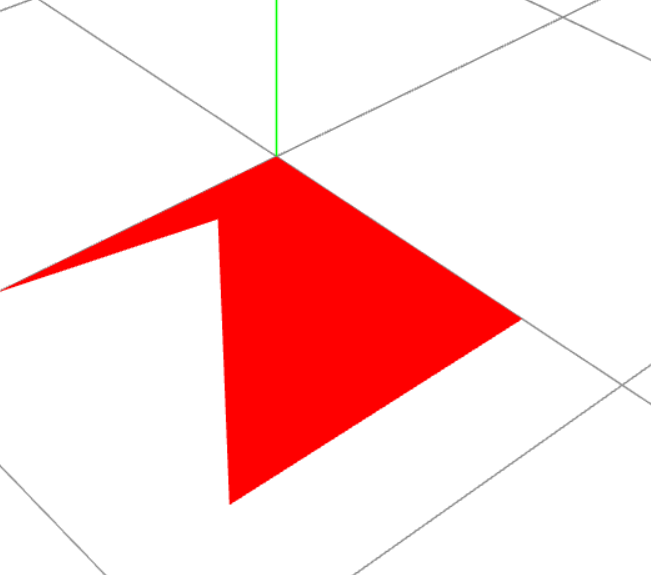
通过 THREE.BufferGeometry 可以够着自定义的图形
1
2
3
4
5
6
7
8
9
10
11
12
13
14
15
16
17
18
19
20
21
22
23
24
25
26
| const geo=new THREE.BufferGeometry();
const arr =new Float32Array([
0,0,0,
2,0,2,
2,0,0,
0,0,0,
2,0,2,
2,2,2,
0,0,0,
0,0,2,
2,2,2,
])
const points=new THREE.BufferAttribute(arr,3);
geo.setAttribute('position',points)
const material = new THREE.MeshBasicMaterial(
{ color: 'red',side:DoubleSide});
const obj = new THREE.Mesh(geo, material);
addObjectToScene([obj]);
|
如上代码绘制的3个三角面
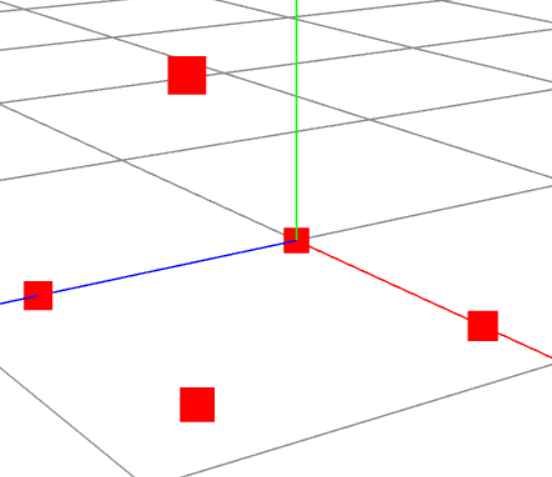
渲染成点模型,修改材质
1
2
3
4
5
6
| var material=new THREE.PointsMaterial({
color:'red'
size: 0.5
});
const obj=new THREE.Points(geo,material)
addObjectToScene([obj]);
|
如上代码绘制的9个点
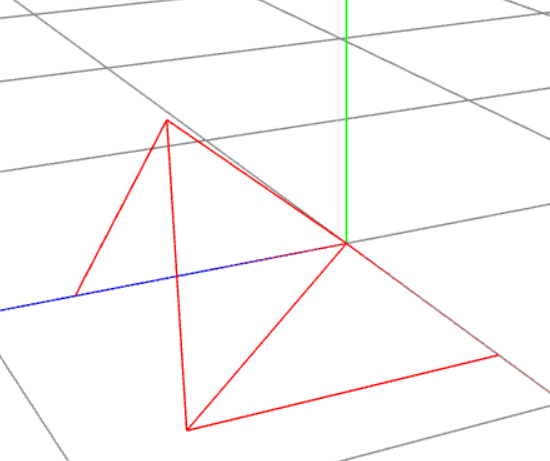
渲染成线模型,修改材质
1
2
3
4
| var material=new THREE.LineBasicMaterial({
color:'red' })
var obj=new THREE.Line(geo,material)
addObjectToScene([obj]);
|
如上代码绘制的9条线
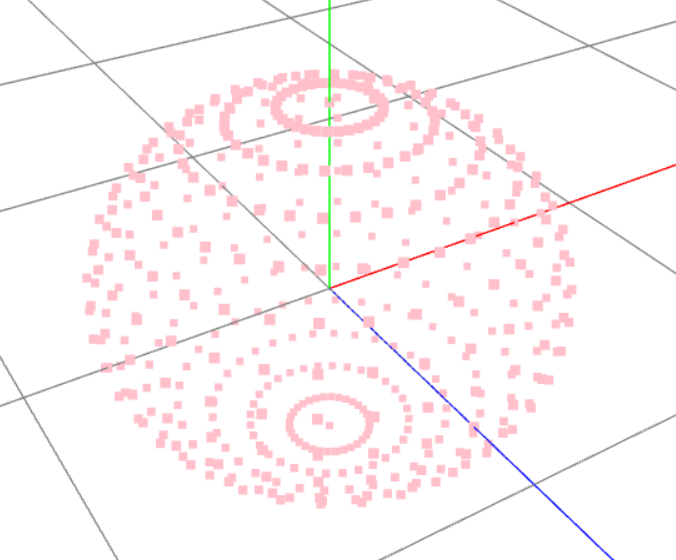
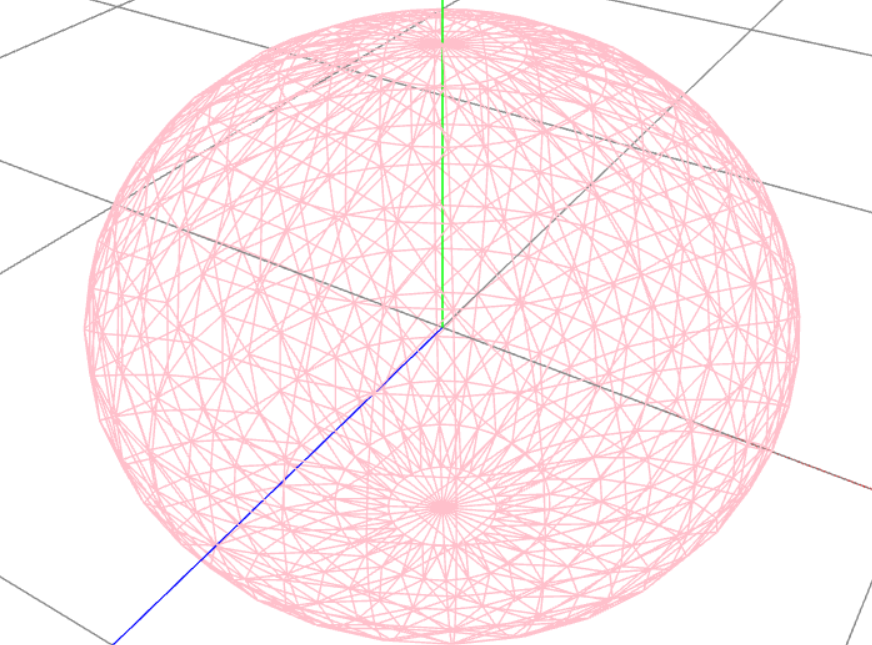
几何体的本质
立方体几何体BoxGeometry本质上就是一系列的顶点构成,只是Threejs的APIBoxGeometry把顶点的生成细节封装了,用户可以直接使用。比如一个立方体网格模型,有6个面,每个面至少两个三角形拼成一个矩形平面,每个三角形三个顶点构成,
对于球体网格模型而言,同样是通过三角形拼出来一个球面,三角形数量越多,网格模型表面越接近于球形。

如下的球体,查看顶点,和线 mesh ,漂亮的球体也是有大量的点连城的线绘制的三角面
1
2
3
4
5
6
7
8
9
10
11
12
13
14
15
16
| const sphere=new THREE.SphereGeometry(2)
const materia=new THREE.PointsMaterial({
color:'pink',
size:0.1
})
const points=new THREE.Points(sphere,materia)
addObjectToScene([points]);
const sphere=new THREE.BoxGeometry(2)
const materia=new THREE.LineBasicMaterial({
color:'pink',
side:DoubleSide,
})
const points=new THREE.Line(sphere,materia)
addObjectToScene([points]);
|
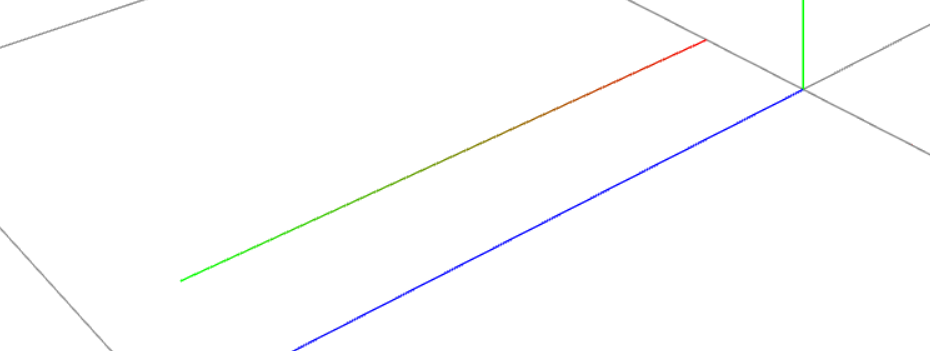
颜色插值计算
线段颜色有顶点颜色插值得来
1
2
3
4
5
6
7
8
9
10
11
12
13
14
15
16
17
18
19
20
21
22
23
24
25
26
| const line = new THREE.BufferGeometry();
const pointArr = new Float32Array([
0, 0, 0,
0, 0, 2,
])
line.setAttribute('position', new THREE.Float32BufferAttribute(pointArr, 3))
const colorArr = new Float32Array([
1, 0, 0,
0, 1, 0,
]);
line.setAttribute('color', new THREE.Float32BufferAttribute(colorArr, 3))
const material = new THREE.LineBasicMaterial({
vertexColors: true,
side: THREE.DoubleSide,
});
const obj = new THREE.Line(line, material)
obj.position.z = 0.5
obj.position.y = 0.5
addObjectToScene([obj]);
|
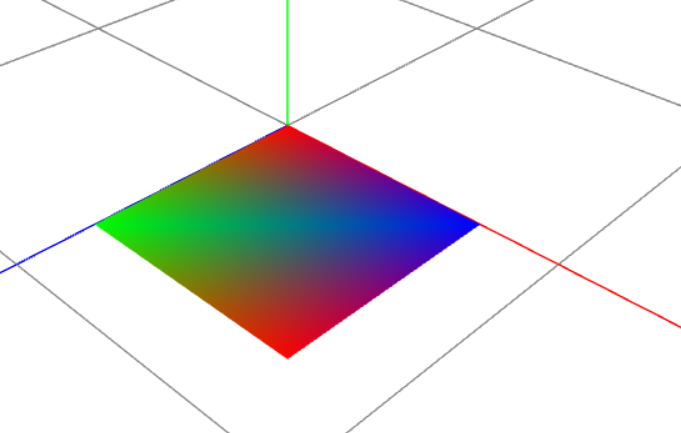
面颜色插值
1
2
3
4
5
6
7
8
9
10
11
12
13
14
15
16
17
18
19
20
21
22
23
24
25
26
27
28
29
30
31
32
33
34
35
|
const rectangle = new THREE.BufferGeometry();
const pointArr = new Float32Array([
0, 0, 0,
0, 0, 2,
2, 0, 0,
0, 0, 2,
2, 0, 2,
2, 0, 0,
])
rectangle.setAttribute('position', new THREE.Float32BufferAttribute(pointArr, 3))
const colorArr = new Float32Array([
1, 0, 0,
0, 1, 0,
0, 0, 1,
0, 1, 0,
1, 0, 0,
0, 0, 1,
]);
rectangle.setAttribute('color', new THREE.Float32BufferAttribute(colorArr, 3))
const material = new THREE.MeshBasicMaterial({
vertexColors: true,
side: THREE.DoubleSide,
});
const obj = new THREE.Mesh(rectangle, material)
addObjectToScene([obj]);
|
带法线的几何体
如果渲染的材质是可以反射光的材质,必须要设置法向
上面的例子面插值,如果更改材质为 MeshLambertMaterial,面显示黑色,就是因为没有设置法线的原因
1
2
3
4
5
| const material = new THREE.MeshLambertMaterial({
vertexColors: true,
side: THREE.DoubleSide,
});
|
增加法线后 MeshLambertMaterial 材质才知道如何反射光线
1
2
3
4
5
6
7
8
9
10
11
|
const normalArr = new Float32Array([
0, 1, 0,
0, 1, 0,
0, 1, 0,
0, 1, 0,
0, 1, 0,
0, 1, 0,
]);
rectangle.setAttribute('normal', new THREE.Float32BufferAttribute(normalArr, 3))
|
通过索引减少重复的点
绘制一个正方形常规是用4个点,而不是6个点,有俩个点是重复的,但是在THREE 里正方形是由三角形拼接的,不考虑分段,一个正方形需要俩个三角形才能拼接出来
俩个三角形是6个顶点,有俩个是重复的,通过索引复用顶点可以用四个点绘制正方形
1
2
3
4
5
6
7
8
9
10
11
12
13
14
15
16
17
18
19
20
21
22
23
24
25
26
27
28
29
30
31
32
33
34
35
36
37
38
39
40
41
42
43
44
45
46
47
48
49
|
const pointArr = new Float32Array([
0, 0, 0,
0, 0, 2,
2, 0, 2,
2, 0, 0,
]);
const colorArr = new Float32Array([
1, 0, 0,
0, 1, 0,
0, 0, 1,
1, 0, 0,
])
const normalArr = new Float32Array([
0, 1, 0,
0, 1, 0,
0, 1, 0,
0, 1, 0,
]);
const indexArr = new Uint16Array([
0, 1, 3,
1, 2, 3
]);
const rectangle = new THREE.BufferGeometry();
rectangle.setAttribute('position', new THREE.Float32BufferAttribute(pointArr, 3));
rectangle.setAttribute('normal', new THREE.Float32BufferAttribute(normalArr, 3));
rectangle.setAttribute('color', new THREE.Float32BufferAttribute(colorArr, 3));
rectangle.index = new THREE.BufferAttribute(indexArr, 1)
const material = new THREE.MeshLambertMaterial({
vertexColors: true,
side: THREE.DoubleSide,
});
const obj1 = new THREE.Mesh(rectangle, material)
obj1.position.x = -5
addObjectToScene([obj1]);
|
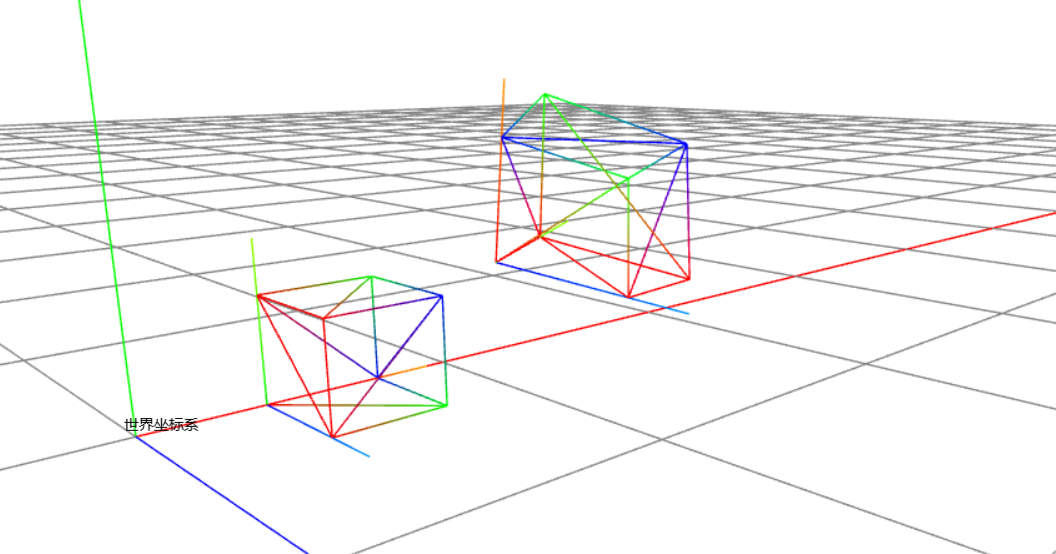
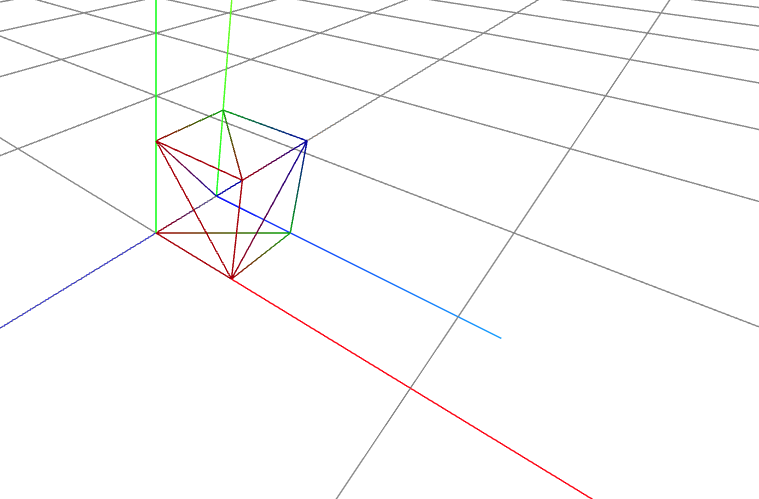
通过索引自定义正方体
1
2
3
4
5
6
7
8
9
10
11
12
13
14
15
16
17
18
19
20
21
22
23
24
25
26
27
28
29
30
31
32
33
34
35
36
37
38
39
40
41
42
43
44
45
46
47
48
49
50
51
52
53
54
55
56
57
58
59
60
61
62
63
64
65
66
67
68
69
70
71
72
73
74
75
76
77
78
|
const pointArr = new Float32Array([
0, 0, 1,
1, 0, 1,
1, 1, 1,
0, 1, 1,
0, 1, 0,
1, 1, 0,
1, 0, 0,
0, 0, 0,
]);
const colorArr = new Float32Array([
1, 0, 0,
0, 1, 0,
0, 0, 1,
1, 0, 0,
1, 0, 0,
0, 1, 0,
0, 0, 1,
1, 0, 0,
])
const normalArr = new Float32Array([
0, 1, 0,
0, 1, 0,
0, 1, 0,
0, 1, 0,
0, 1, 0,
0, 1, 0,
0, 1, 0,
0, 1, 0,
]);
const indexArr = new Uint8Array([
0, 1, 2,
2, 3, 0,
3, 2, 5,
5, 4, 3,
6, 7, 4,
4, 6, 6,
1, 6, 2,
2, 6, 5,
0, 7, 4,
4, 3, 0,
0, 1, 7,
7, 1, 6
]);
const rectangle = new THREE.BufferGeometry();
rectangle.setAttribute('position', new THREE.Float32BufferAttribute(pointArr, 3));
rectangle.setAttribute('normal', new THREE.Float32BufferAttribute(normalArr, 3));
rectangle.setAttribute('color', new THREE.Float32BufferAttribute(colorArr, 3));
rectangle.index = new THREE.BufferAttribute(indexArr, 1)
const material = new THREE.MeshLambertMaterial({
vertexColors: true,
side: THREE.DoubleSide,
wireframe: true
});
const obj = new THREE.Mesh(rectangle, material)
addObjectToScene([obj]);
|
访问几何体数据及拷贝复制
访问几何体并更改数据
1
2
3
4
5
6
7
8
9
10
11
12
13
14
15
16
17
| const box = new THREE.BoxGeometry(1, 1, 1);
const material = new THREE.MeshLambertMaterial(
{ color: 0x00ffff, transparent: true, opacity: 0.5, wireframe: false, side: THREE.DoubleSide });
const mesh = new THREE.Mesh(box, material);
mesh.geometry.parameters.height=2
box.scale.set(1,2,1)
mesh.scale.set(1,2,1)
mesh.material.color=new THREE.Color('red')
addObjectToScene([mesh]);
|
拷贝复制
对几何体 colone 是深拷贝,对mesh colone 是浅 colone
1
2
3
4
5
6
7
8
9
10
11
12
13
14
15
16
17
18
19
20
21
| const box = new THREE.BoxGeometry(1, 1, 1);
const material = new THREE.MeshLambertMaterial(
{ color: 0x00ffff, transparent: true, opacity: 0.5, wireframe: false, side: THREE.DoubleSide });
console.log(box.id)
const newBox= box.clone()
console.log(newBox.id)
console.log(material.id)
const newMaterial= material.clone()
console.log(newMaterial.id)
const mesh = new THREE.Mesh(box, material);
console.log(mesh.id)
console.log(mesh.geometry.id)
console.log(mesh.material.id)
const newMesh= mesh.clone()
console.log(newMesh.id)
console.log(newMesh.geometry.id)
console.log(newMesh.material.id)
|
mesh 的copy 是浅 copy
1
2
3
4
5
6
7
8
9
10
11
12
13
14
15
16
|
const box = new THREE.BoxGeometry(1, 1, 1);
const material = new THREE.MeshLambertMaterial(
{ color: 0x00ffff, transparent: true, opacity: 0.5, wireframe: false, side: THREE.DoubleSide });
console.log(box.id)
const newBox=new THREE.BoxGeometry().copy(box)
console.log(newBox.id)
const mesh = new THREE.Mesh(newBox, material);
console.log(mesh.geometry.id)
console.log(mesh.material.id)
const newMesh = new THREE.Mesh().copy(mesh);
console.log(newMesh.geometry.id)
console.log( (newMesh.material as THREE.MeshLambertMaterial).id)
|
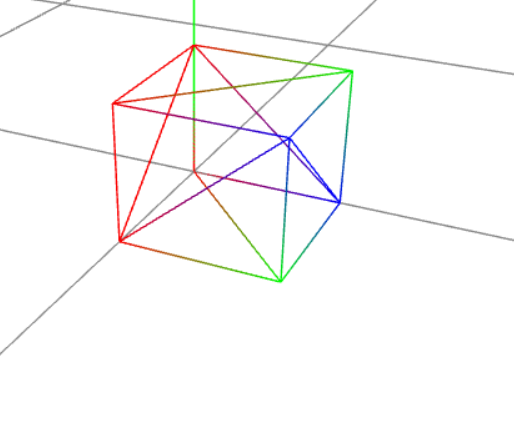
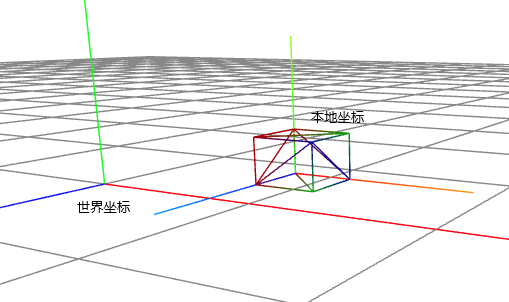
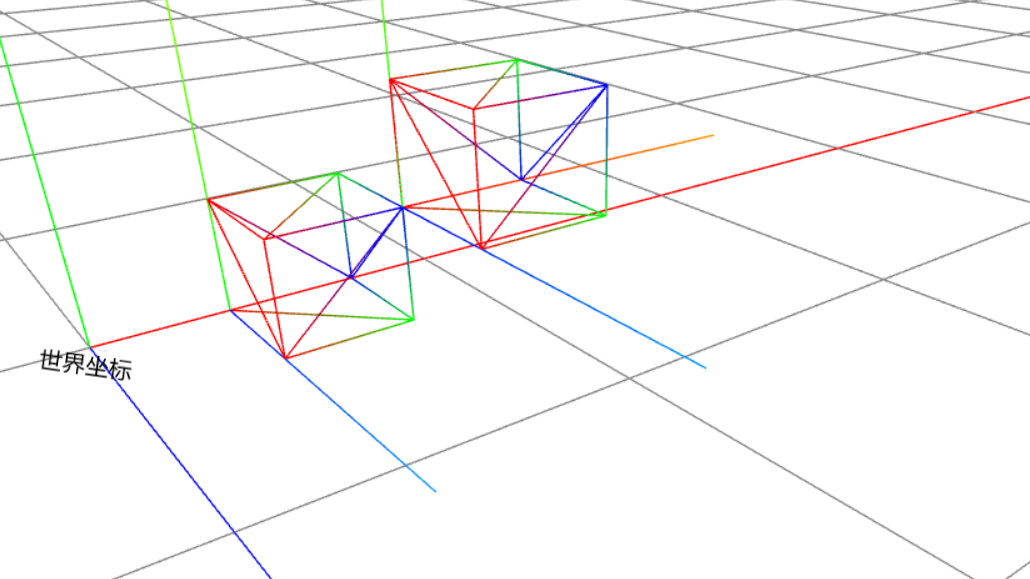
本地坐标和世界坐标
世界坐标中心点默认在画布的中心位置,一个 scene 只有一个世界坐标,方向参考右手定则
默认世界坐标的中心画布中心,通过如下方法可以更改世界坐标的中心
scene.current.position.set(1,1,1)
本地坐标,每个 mesh 都有一个本地坐标,默认坐标的中心在几何体的中心位置
在不指定 mesh 本地坐标的情况下,默认本地坐标和世界坐标的中心重合
本地坐标的 position 是参考世界坐标的,对 mesh 进行 平移,缩放,旋转 会改变 mesh 的 position 位置
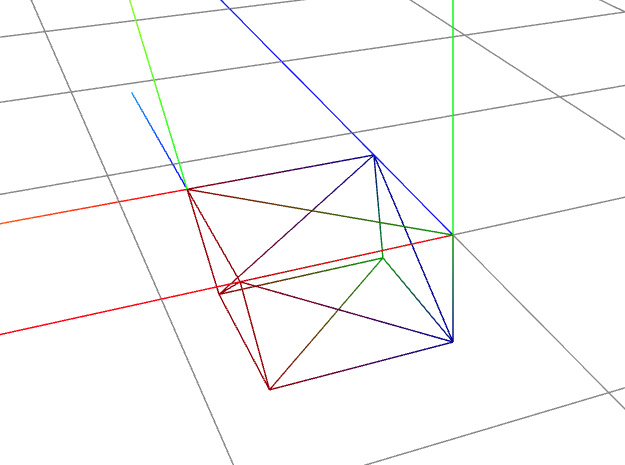
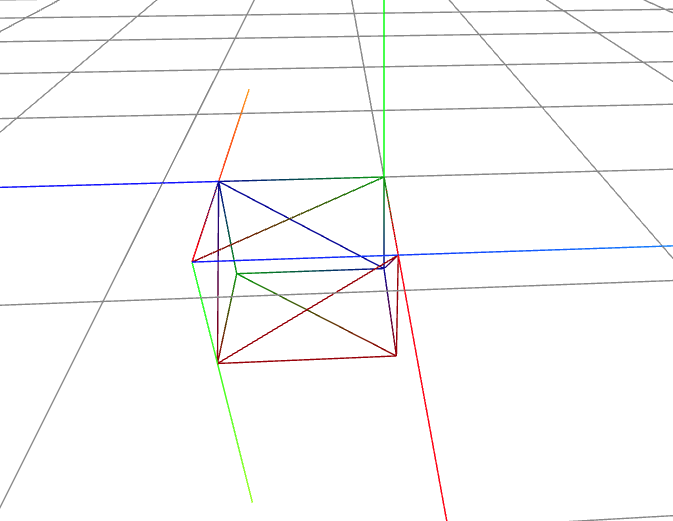
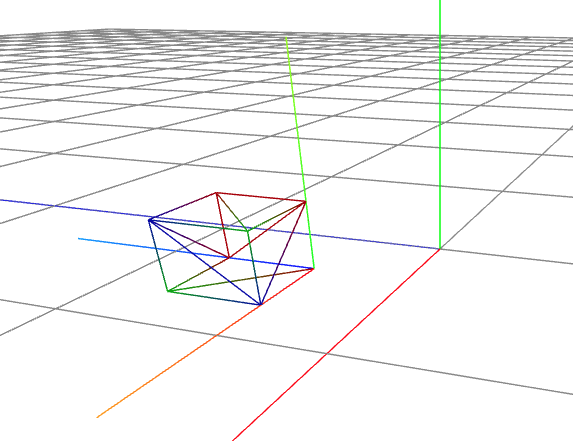
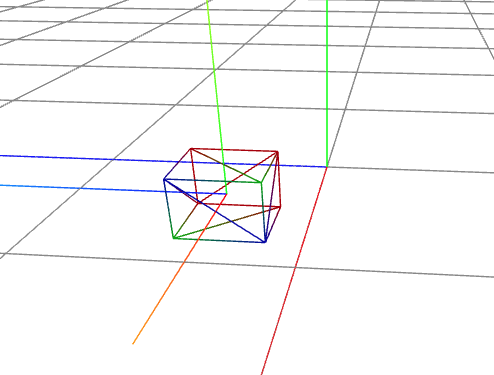
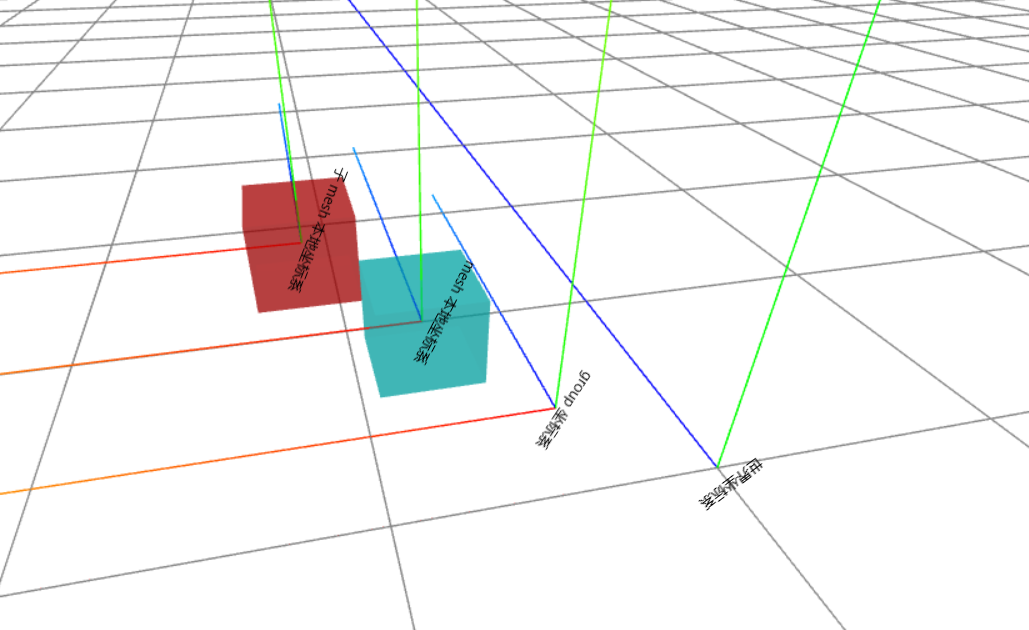
上面的自定义正方体的例子,默认本地坐标和世界坐标是重合的,对 mesh 进行平移,就能看出来本地坐标的中心在几何体的中心位置(图中的几何体的中心点在坐标 (0,0,0) 位置)
对几何体的进行平移,缩放,旋转的参考都参考几何体本地坐标进行的,会改变几何体的顶点数据,因为顶点的坐标是参考本地坐标定义的
对 mesh 进行 平移,缩放,旋转 ,参考的是本地坐标,mesh 内的几何体的顶点坐标相对 mesh 的本地坐标并没有发生改变(除过缩放),因为 THREE.js 会一起更新几何体,
对 mesh 进行 平移,缩放,旋转 ,能改变 mesh 相对于世界坐标的 position 位置
1
2
3
4
5
6
7
| const obj = new THREE.Mesh(rectangle, material)
const axesHelper=new THREE.AxesHelper(3)
obj.add(axesHelper)
obj.translateX(2);
obj.translateZ(-2);
|
旋转 缩放 平移 ,旋转方向是右手定则
旋转 底层是欧拉角Euler
欧拉角是用来表示三维坐标系中方向和方向变换的
对几何进行旋转,会改变几何体的顶点坐标,因为本地坐标没有旋转,相对的几何体的顶点坐标就变化了
对 mesh ,group 对象进行旋转不对改变几何体的顶点坐标,因为几何体的顶点坐标是参考本地坐标的
在本地坐标旋转的时候,几何体的本地顶点坐标也会跟着一起变化。
rotateX, rotateY,rotateZ,
要有旋转的效果必须渲染函数里重复调用
测试的版本是 R144
对于mesh 或 geometry 旋转效果是围绕几何体自身的本地坐标轴旋转
group 对象是围绕世界坐标系旋转
还是自定义正方体的例子.本地坐标没有改变
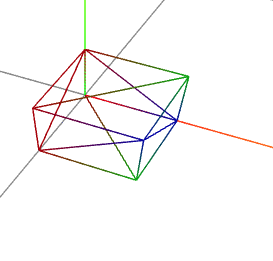
对 mesh 进行旋转参考的坐标轴是几何体本地的坐标轴,
1
2
3
4
5
6
7
8
9
10
11
12
13
| const obj = new THREE.Mesh(rectangle, material)
console.table(rectangle.getAttribute('position'))
obj.rotateZ(Math.PI*0.5)
obj.translateY(1)
rectangle.translate(1,0,0)
console.table(rectangle.getAttribute('position'))
const axesHelper=new THREE.AxesHelper(3)
obj.add(axesHelper)
addObjectToScene([obj]);
|
rotateOnAxis,
rotateOnWorldAxis 以世界坐标系为起点
因为向量的原因只能是mesh group 使用此API
如果绕 Y 轴旋转如下设置
rotateOnAxis(new THREE.Vector3(0,1,0) ,MathUtils.degToRad(1))
如果绕 Y 轴反向旋转如下设置
rotateOnAxis(new THREE.Vector3(0,-1,0) ,MathUtils.degToRad(1))
以 mesh 本地坐标中心为起点 new Vector3(1,1,1) 为终点的自定义旋转轴
1
2
3
4
5
6
7
8
9
10
11
| const obj1 = new THREE.Mesh(rectangle, material)
obj1.translateX(1)
const obj2= obj1.clone()
const v3= new Vector3(1,1,1)
obj2.rotateOnAxis(v3,Math.PI*0.25)
obj2.translateOnAxis(v3,1)
const axesHelper=new THREE.AxesHelper(1.5)
obj1.add(axesHelper)
obj2.add(axesHelper.clone())
addObjectToScene([obj1,obj2]);
|
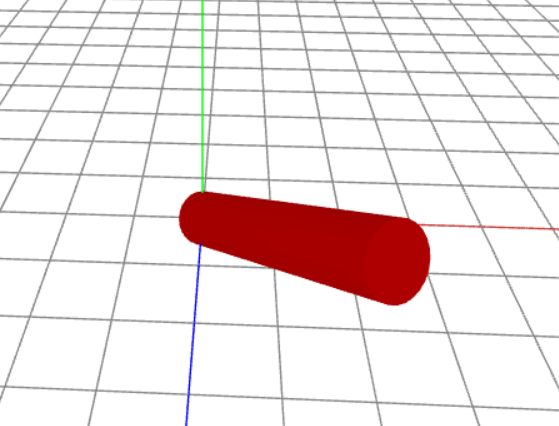
当父对象旋转的时候,子对象绕父对象旋转
1
2
3
4
5
6
7
8
9
10
11
12
13
14
15
16
17
| const cylinder = new THREE.CylinderGeometry(0.5, 1, 4);
const cylinderMesh = new THREE.Mesh(cylinder, material);
cylinderMesh.position.set(5,cylinder.parameters.height/2,0)
const box = new THREE.BoxGeometry(1.2, 1.2, 1.2);
const boxMesh = new THREE.Mesh(box, material);
boxMesh1.position.set(2,box1.parameters.height/2-cylinder.parameters.height/2,2)
cylinderMesh.add(boxMesh1)
addMeshesToScene([cylinderMesh]);
configPrimaryAnimation(new Map<string, Function>([
["a1", () => cylinderMesh.rotateY(MathUtils.degToRad(1))],
]))
|
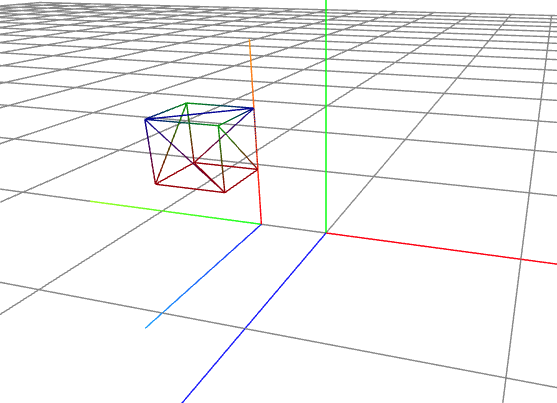
平移
translateX ,translateY, translateZ
对几何进行translate,会改变几何体的顶点坐标, 因为本地坐标没有 translate
对 mesh ,组对象进行 translate 不会改变顶点坐标,因为几何体的顶点坐标会跟着 mesh 的本地坐标进行 translate
还是自定义正方体的例子.本地坐标没有改变
此正方体的长宽高都是1,先对几何体的本地坐标参考自己的Y 轴旋转 90 度
在对几何体的本地坐标x轴上参考自己的 X 轴 平移1,在对几何体在参考本地坐标 X 轴平移 -1
1
2
3
4
5
6
7
8
9
10
11
12
13
14
15
16
17
| const obj = new THREE.Mesh(rectangle, material)
console.table(rectangle.getAttribute('position'))
console.table(rectangle.getAttribute('position'))
obj.rotateY(Math.PI*0.5)
obj.translateX(1);
console.table(rectangle.getAttribute('position'))
rectangle.translate(-1,0,0);
console.table(rectangle.getAttribute('position'))
const axesHelper=new THREE.AxesHelper(3)
obj.add(axesHelper)
|
translateOnAxis 沿着着指定的向量方向平移一定的距离
translateOnAxis 可以灵活的向任意方向平移,因为向量的原因只能是mesh group 使用此API
1
2
3
4
5
6
7
8
9
10
11
12
13
14
15
| const obj = new THREE.Mesh(rectangle, material)
obj1.translateX(1)
const obj2= obj.clone()
const v3= new Vector3(1,1,1)
obj2.translateOnAxis(v3,1)
const axesHelper=new THREE.AxesHelper(3)
obj1.add(axesHelper)
obj2.add(axesHelper.clone())
addObjectToScene([obj1,obj2]);
|
缩放
对几何体进行 scale,会改变几何体的顶点坐标, 缩放是三个方向都可以的 scale(x,y,z)
几何体 scale(-x,-y,-z) 的效果是几何体会到反方向的底部。
对 mesh , group 进行 scale ,几何体的体积会变化,但是比较奇怪的是顶点坐标不会变化。或许是为了和 平移,旋转 保持一致吧
mesh scale(-x,-y,-z) 的效果是几何体会到反方向的底部。坐标轴也会到反方向的底部
设置几何体的几何中心
center 几何体调用此方法后会让几何体的中心居于本地坐标的中心,而不是默认的顶点坐标最小点
会改变几何体的所有顶点坐标
1
2
3
4
5
6
7
8
9
10
11
12
13
| const obj = new THREE.Mesh(rectangle, material)
console.table(rectangle.getAttribute('position'))
console.table(obj.position)
obj.translateX(1)
obj.translateZ(1)
rectangle.center();
console.table(rectangle.getAttribute('position'))
console.table(obj.position)
const axesHelper = new THREE.AxesHelper(3)
obj.add(axesHelper)
addObjectToScene([obj]);
|
矩阵变换、欧拉、四元数、
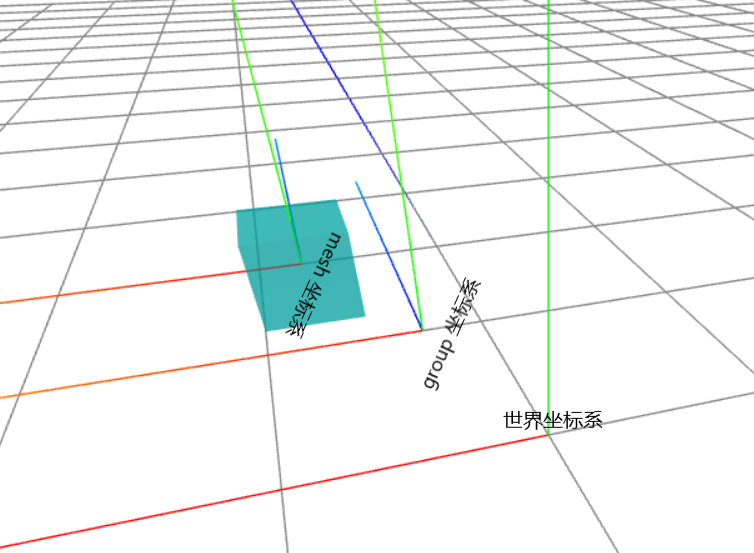
几何体的层次结构
通过 group 建立层级关系
嵌套的层级关系,里面的对象参考外面对象的坐标
1
2
3
4
5
6
7
8
9
10
11
12
13
14
15
16
17
18
19
20
21
22
23
24
25
26
27
28
| const ax = new THREE.AxesHelper(5)
const box = new THREE.BoxGeometry(1, 1, 1);
const material = new THREE.MeshLambertMaterial(
{ color: 0x00ffff, transparent: true, opacity: 0.5, wireframe: false, side: THREE.DoubleSide });
const mesh = new THREE.Mesh(box, material);
mesh.translateX(1)
mesh.translateZ(1)
mesh.translateY(0.5)
const group = new THREE.Group()
group.add(mesh)
group.position.set(1,1,1)
console.log(group.position)
console.log(mesh.position)
const v3 = new THREE.Vector3()
mesh.getWorldPosition(v3)
console.log(v3)
group.add(ax.clone())
mesh.add(ax)
addObjectToScene([group]);
|
group.remove 方法也可以移除添加的对象
1
2
3
4
| group.add(mesh)
const newMesh=mesh.clone().translateX(2)
group.add(newMesh)
group.remove(newMesh)
|
mesh 之间也可以建立层级关系
嵌套的层级关系,里面的对象参考外面对象的坐标
** mesh.remove 也可以移除内部的对象
1
2
3
4
5
6
7
8
9
10
11
12
13
14
15
16
17
18
19
20
21
22
23
24
25
26
27
28
| const ax = new THREE.AxesHelper(5)
const box = new THREE.BoxGeometry(1, 1, 1);
const material = new THREE.MeshLambertMaterial(
{ color: 0x00ffff, transparent: true, opacity: 0.5, wireframe: false, side: THREE.DoubleSide });
const v3 = new THREE.Vector3()
const mesh = new THREE.Mesh(box, material);
mesh.translateX(1)
mesh.translateZ(1)
mesh.translateY(0.5)
const group = new THREE.Group()
group.position.set(1,0,1,)
group.add(ax.clone())
group.add(mesh)
const newMesh=mesh.clone().translateX(1)
newMesh.material=new THREE.MeshLambertMaterial().copy(mesh.material)
newMesh.material.color=new THREE.Color('red')
newMesh.position.set(1,0.5,1)
mesh.add(newMesh.add(ax.clone()))
newMesh.getWorldPosition(v3)
console.log(v3);
mesh.add(ax)
addObjectToScene([group]);
|
绘制平面图形
直线
1
2
3
4
5
6
7
8
9
10
11
| const ax = new THREE.AxesHelper(5)
const startV2=new THREE.Vector2(0,0)
const endV2=new THREE.Vector2(5,5)
const line=new THREE.LineCurve(startV2,endV2);
const geo=new THREE.BufferGeometry().setFromPoints(line.getPoints(50))
const mesh=new THREE.Line(geo,new THREE.LineBasicMaterial({
color:'pink',
}))
mesh.rotateX(Math.PI*0.5)
mesh.add(ax)
addObjectToScene([mesh]);
|

三位空间的直线
1
2
3
4
5
6
7
8
9
10
| const ax = new THREE.AxesHelper(5)
const startV3=new THREE.Vector3(0,0,0)
const endV3=new THREE.Vector3(2,2,2)
const geo=new THREE.BufferGeometry().setFromPoints([startV3,endV3])
const mesh=new THREE.Line(geo,new THREE.LineBasicMaterial({
color:'pink',
}))
mesh.add(ax)
addObjectToScene([mesh]);
|
1
2
3
4
5
6
7
8
9
10
| const ax = new THREE.AxesHelper(5)
const startV2=new THREE.Vector3(0,0)
const endV2=new THREE.Vector3(5,5,5)
const line=new THREE.LineCurve3(startV2,endV2);
const geo=new THREE.BufferGeometry().setFromPoints(line.getPoints(50))
const mesh=new THREE.Line(geo,new THREE.LineBasicMaterial({
color:'pink',
}))
mesh.add(ax)
addObjectToScene([mesh]);
|
圆弧
ArcCurve
1
2
3
4
5
6
7
8
9
10
11
12
13
14
| const ax = new THREE.AxesHelper(5)
const arc=new THREE.ArcCurve(0,0,5,0,Math.PI,false);
const geo=new THREE.BufferGeometry().setFromPoints(arc.getPoints(50))
const mesh1=new THREE.Line(geo,new THREE.LineBasicMaterial({
color:'red',
}))
mesh.rotateX(Math.PI*0.5).translateX(2).translateY(1)
mesh.add(ax)
addObjectToScene([mesh]);
|

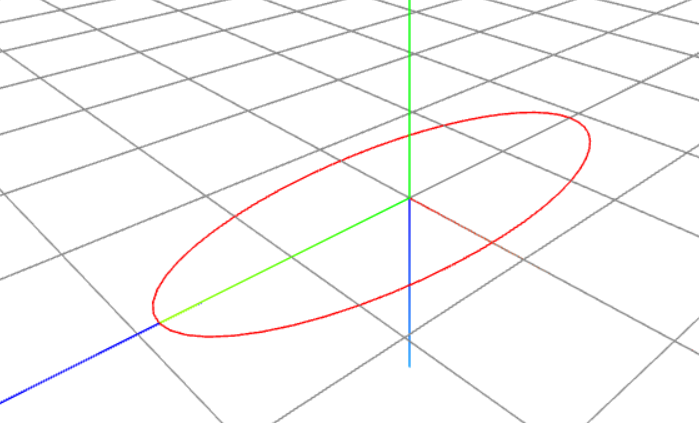
椭圆
Ellipse
1
2
3
4
5
6
7
8
9
10
11
| const ax = new THREE.AxesHelper(5)
const ellipse=new THREE.EllipseCurve(0,0,5,2,0,2*Math.PI,false,Math.PI*0.5);
const geo=new THREE.BufferGeometry().setFromPoints(ellipse.getPoints(50))
const mesh=new THREE.Line(geo,new THREE.LineBasicMaterial({
color:'red',
}))
mesh.rotateX(Math.PI*0.5)
mesh.add(ax)
addObjectToScene([mesh]);
|
样条曲线
SplineCurve 二维样条曲线
CatmullRomCurve3 三维样条曲线
1
2
3
4
5
6
7
8
9
10
11
12
13
14
15
16
17
18
19
20
21
22
23
| const ax = new THREE.AxesHelper(5)
const curve1=new THREE.CatmullRomCurve3([
new THREE.Vector3(0,0,0),
new THREE.Vector3(1,1,1),
new THREE.Vector3(1,1,-1),
],true)
const curve2=new THREE.CatmullRomCurve3([
new THREE.Vector3(0,0,0),
new THREE.Vector3(-1,1,1),
new THREE.Vector3(-1,1,-1),
],true)
const geo1=new THREE.BufferGeometry().setFromPoints(curve1.getPoints(50))
const geo2=new THREE.BufferGeometry().setFromPoints(curve2.getPoints(50))
const mesh1=new THREE.Line(geo1,new LineBasicMaterial({color:'#B09A37'}))
const mesh2=new THREE.Line(geo2,new LineBasicMaterial({color:'#B09A37'}))
const group=new THREE.Group()
group.add(mesh1,mesh2)
group.add(ax)
addObjectToScene([group]);
|

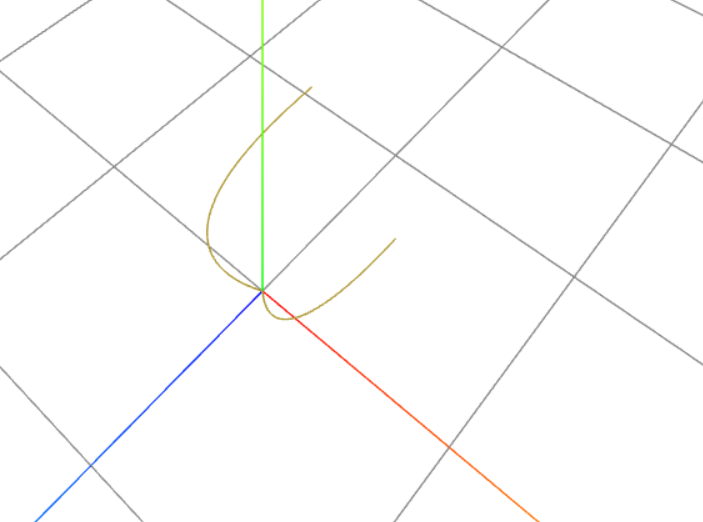
贝塞尔曲线
贝塞尔曲线有二维和三维的
1
2
3
4
5
6
7
8
9
10
11
12
13
14
15
16
17
18
19
20
21
22
23
24
25
26
| const ax = new THREE.AxesHelper(5)
const curve1=new THREE.QuadraticBezierCurve3(
new THREE.Vector3(0,0,0),
new THREE.Vector3(1,1,1),
new THREE.Vector3(1,1,-1),
)
const curve2=new THREE.CubicBezierCurve3(
new THREE.Vector3(0,0,0),
new THREE.Vector3(-1,1,1),
new THREE.Vector3(-1,1,-1),
new THREE.Vector3(-1,1,-2),
)
const geo1=new THREE.BufferGeometry().setFromPoints(curve1.getPoints(50))
const geo2=new THREE.BufferGeometry().setFromPoints(curve2.getPoints(50))
const mesh1=new THREE.Line(geo1,new LineBasicMaterial({color:'#B09A37'}))
const mesh2=new THREE.Line(geo2,new LineBasicMaterial({color:'#B09A37'}))
const group=new THREE.Group()
group.add(mesh1,mesh2)
group.add(ax)
addObjectToScene([group]);
|
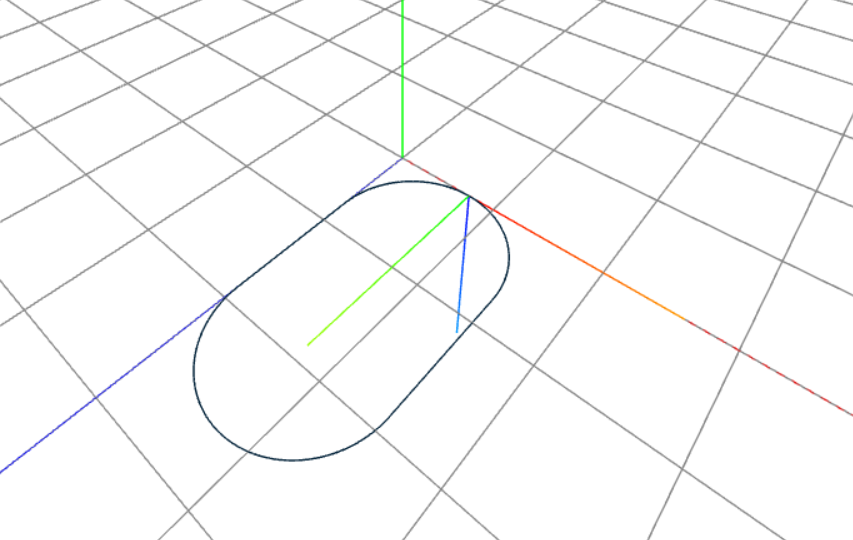
多个线条组合曲线CurvePath
绘制跑道,注意要按照固定的顺序绘制,此线是按照顺时针绘制的
1
2
3
4
5
6
7
8
9
10
11
12
13
14
15
16
17
| const ax = new THREE.AxesHelper(5)
const curve1=new THREE.ArcCurve(0,5,2,Math.PI,0,true)
const curve2=new THREE.LineCurve(new THREE.Vector2(2,5),new THREE.Vector2(2,2))
const curve3=new THREE.ArcCurve(0,2,2,0,Math.PI,true)
const curve4=new THREE.LineCurve(new THREE.Vector2(-2,2),new THREE.Vector2(-2,5))
const curvePath=new THREE.CurvePath()
curvePath.curves.push(curve1,curve2,curve3,curve4)
const geo=new THREE.BufferGeometry()
geo.setFromPoints(curvePath.getPoints(200) as THREE.Vector2[])
const line=new THREE.Line(geo,new THREE.LineBasicMaterial({
color:'#022239',
}))
line.rotateX(Math.PI*0.5).translateX(2)
line.add(ax)
addObjectToScene([line]);
|
path
只是线段,没有三角面,path 能显示的只能是点及有点组成的线段,不能渲染成形状
1
2
3
4
5
6
7
8
9
10
11
12
13
14
15
16
17
18
19
20
21
22
23
24
|
const path = new THREE.Path()
path.moveTo(2, 1)
path.lineTo(3, 1)
path.bezierCurveTo(3, 6, 5, 6, 5, 1)
path.arc(1, 0, 1, Math.PI, 0, true)
path.lineTo(8, 1)
path.lineTo(8, 0.5)
path.lineTo(2, 0.5)
path.lineTo(2, 1)
const geo = new THREE.BufferGeometry().setFromPoints(path.getPoints(30))
const mesh = new THREE.Line(geo, new LineBasicMaterial({ color: 'red', side: THREE.DoubleSide}))
addObjectToScene([mesh]);
|
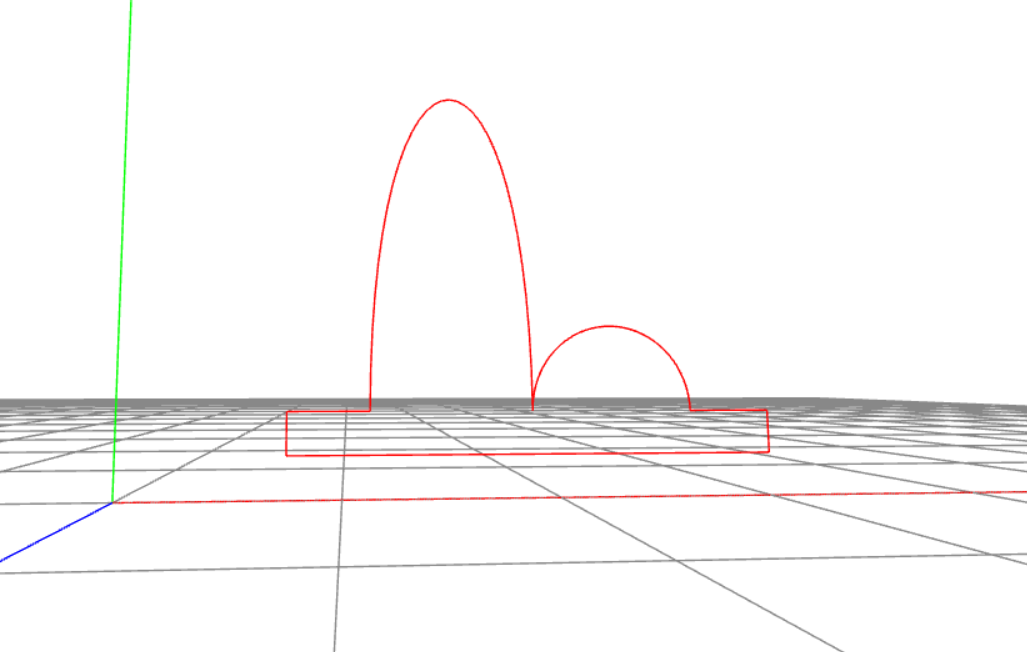
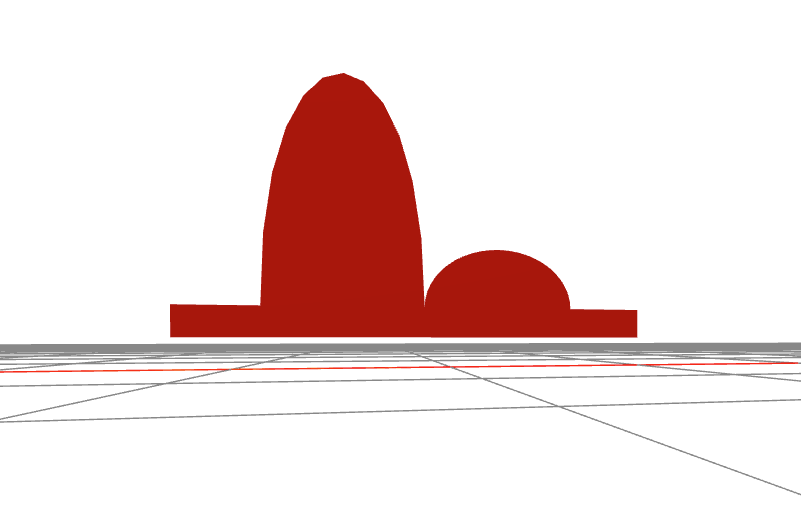
shape
shape 类似 HTML DOM Canvas 对象,通过路径来绘制二维形状平面。简单理解就是在一个平面上用不规则的线连接成一个图形
多个线条的组合
1
2
3
4
5
6
7
8
9
10
11
12
13
14
15
16
17
18
19
20
21
22
23
24
|
const shape = new THREE.Shape()
shape.moveTo(2, 1)
shape.lineTo(3, 1)
shape.bezierCurveTo(3, 6, 5, 6, 5, 1)
shape.arc(1, 0, 1, Math.PI, 0, true)
shape.lineTo(8, 1)
shape.lineTo(8, 0.5)
shape.lineTo(2, 0.5)
const geo = new THREE.ShapeGeometry(shape)
const mesh = new THREE.Mesh(geo, new MeshLambertMaterial({ color: 'red', side: THREE.DoubleSide, wireframe: false }))
mesh.add(ax)
addObjectToScene([mesh]);
|
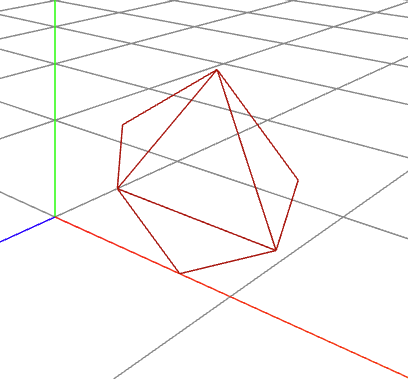
多个点的组合
1
2
3
4
5
6
7
8
9
10
11
12
13
14
15
| const points = [
new THREE.Vector2(1, 1),
new THREE.Vector2(2, 0),
new THREE.Vector2(3, 1),
new THREE.Vector2(3, 2),
new THREE.Vector2(2, 3),
new THREE.Vector2(1, 2),
]
const shape = new THREE.Shape(points)
const geo = new THREE.ShapeGeometry(shape)
const mesh = new THREE.Mesh(geo, new MeshLambertMaterial({ color: 'red', side: THREE.DoubleSide, wireframe: true }))
addObjectToScene([mesh]);
|
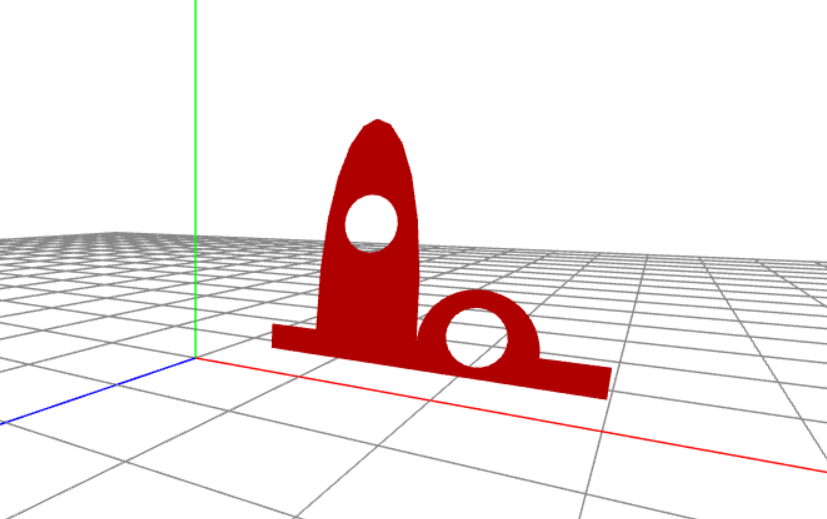
在形状内部挖孔
shape.holes 可以用path 或 shape 去挖 shape 的孔
1
2
3
4
5
6
7
8
9
10
11
12
13
14
15
16
17
18
19
20
21
22
23
24
25
26
27
28
29
30
| const shape = new THREE.Shape()
shape.moveTo(2, 1)
shape.lineTo(3, 1)
shape.bezierCurveTo(3, 6, 5, 6, 5, 1)
shape.arc(1, 0, 1, Math.PI, 0, true)
shape.lineTo(8, 1)
shape.lineTo(8, 0.5)
shape.lineTo(2, 0.5)
shape.lineTo(2, 1)
const path1=new THREE.Path()
path1.arc(4,3,0.5,0,Math.PI*2,false)
const path2=new THREE.Path()
path2.arc(6,1.2,0.5,0,Math.PI*2,true)
shape.holes.push(path1,path2)
const geo = new THREE.ShapeGeometry(shape)
const mesh = new THREE.Mesh(geo, new MeshLambertMaterial({ color: 'red', wireframe:false, side: THREE.DoubleSide}))
addObjectToScene([mesh]);
|
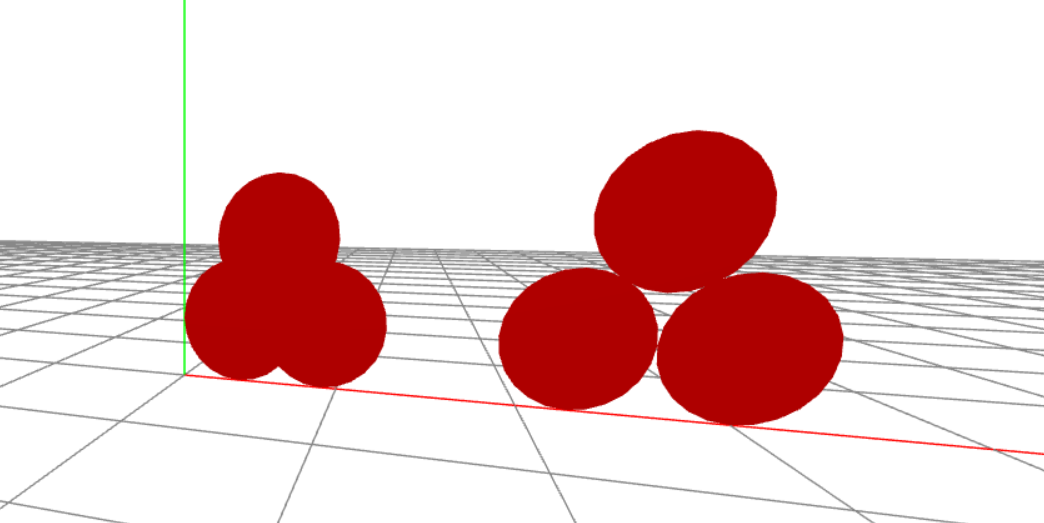
多个shape 的组合
1
2
3
4
5
6
7
8
9
10
11
12
13
14
15
16
17
18
19
20
21
22
| const shape1 = new THREE.Shape()
shape1.arc(1,1,1,0,Math.PI*2,false)
const shape2 = new THREE.Shape()
shape2.arc(2.4,1,1,0,Math.PI*2,false)
const shape3 = new THREE.Shape()
shape3.arc(1.6,2.3,1,0,Math.PI*2,false)
const geo = new THREE.ShapeGeometry([shape1,shape2,shape3])
const mesh = new THREE.Mesh(geo, new MeshLambertMaterial({ color: 'red', wireframe:false, side: THREE.DoubleSide}))
const shape4 = new THREE.Shape()
shape4.arc(1,1,1,0,Math.PI*2,false)
const shape5 = new THREE.Shape()
shape5.arc(3,1,1,0,Math.PI*2,false)
const shape6 = new THREE.Shape()
shape6.arc(2,2.7,1,0,Math.PI*2,false)
const geo1 = new THREE.ShapeGeometry([shape4,shape5,shape6])
const mesh1= new THREE.Mesh(geo1, new MeshLambertMaterial({ color: 'red', wireframe:false, side: THREE.DoubleSide}))
mesh1.translateX(5)
addObjectToScene([mesh,mesh1]);
|
绘制三维图形
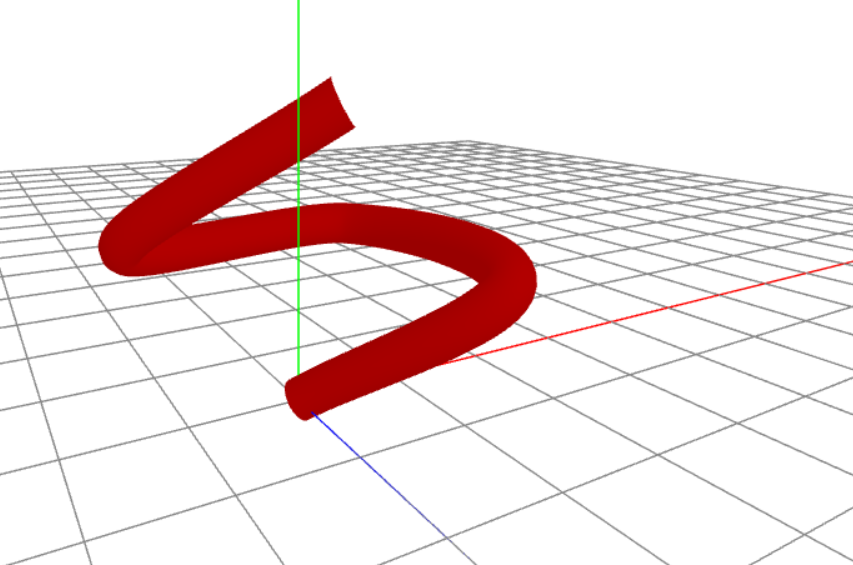
tube
TubeGeometry
1
2
3
4
5
6
7
8
9
10
11
12
13
14
15
16
17
18
19
| const curve1 = new THREE.CatmullRomCurve3(
[
new THREE.Vector3(0, 0, 0),
new THREE.Vector3(3, 3, 3),
new THREE.Vector3(3, 3, -3),
new THREE.Vector3(-3, 3, -3),
new THREE.Vector3(1, 6, 0),
]
)
const curvePath = new THREE.CurvePath<THREE.Vector3>()
curvePath.curves.push(curve1)
const tube = new THREE.TubeGeometry(curvePath, 200, 0.5, 30, false)
const mesh = new THREE.Mesh(tube, new MeshLambertMaterial({
color: 'red'
}))
addObjectToScene([mesh]);
|
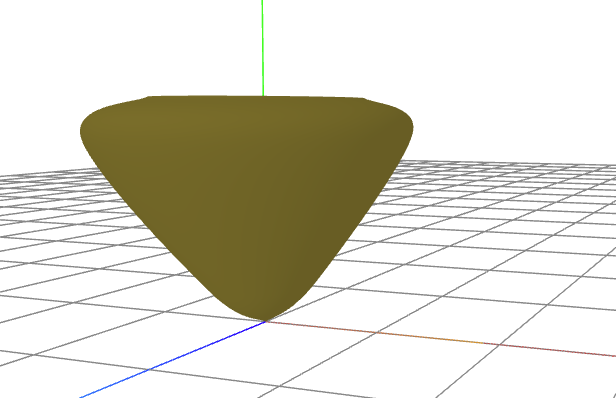
旋转 Lathe
提供2维或3维的点集合
1
2
3
4
5
6
7
8
9
10
11
| const ax = new THREE.AxesHelper(5)
const points=[
new Vector2(1,1),
new Vector2(3,5),
new Vector2(2,6),
]
const geo=new THREE.LatheGeometry(points,30,0,Math.PI)
const mesh=new THREE.Mesh(geo,new MeshLambertMaterial({ color:'#B09A37',side:THREE.DoubleSide}))
mesh.add(ax)
addObjectToScene([mesh]);
|
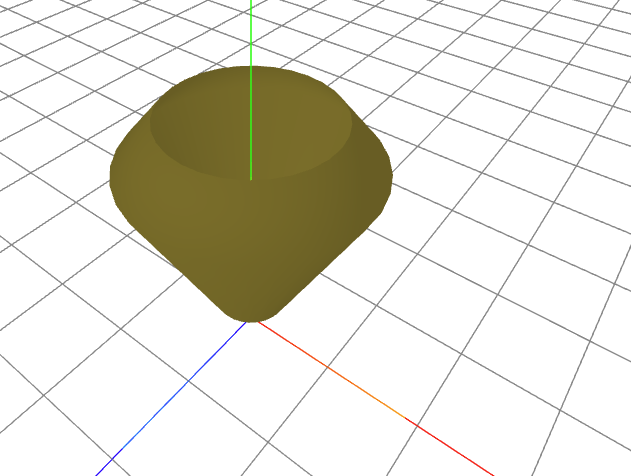
借助Shape对象的方法.splineThru(),把上面的三个顶点进行样条插值计算, 可以得到一个光滑的旋转曲面
shape.getPoints(20)的作用是利用已有的顶点插值计算出新的顶点,两个顶点之间插值计算出20个顶点,如果细分数是1不是20,相当于不进行插值计算, 插值计算的规则通过Shape对象的方法.splineThru()定义,几何曲线的角度描述,splineThru的作用就是创建一个样条曲线,除了样条曲线还可以使用贝赛尔等曲线进行插值计算。
1
2
3
4
5
6
7
8
9
10
11
| const ax = new THREE.AxesHelper(5)
const points=[
new Vector2(1,1),
new Vector2(3,5),
new Vector2(2,6),
]
const shape=new THREE.Shape();
shape.splineThru(points)
const geo=new THREE.LatheGeometry(shape.getPoints(20),30)
const mesh=new THREE.Mesh(geo,new MeshLambertMaterial({ color:'#B09A37',side:THREE.DoubleSide}))
mesh.add(ax)
|
拉伸,扫描成型 ExtrudeGeometry
拉伸成型 是直线拉伸,拉伸的轨迹不能自定义,只能之定义拉伸的距离
1
2
3
4
5
6
7
8
9
10
11
12
13
14
15
16
17
18
19
20
21
| const shape1 = new THREE.Shape()
shape1.arc(1, 1, 1, 0, Math.PI * 2, false)
const shape2 = new THREE.Shape()
shape2.arc(2.4, 1, 1, 0, Math.PI * 2, false)
const shape3 = new THREE.Shape()
shape3.arc(1.6, 2.3, 1, 0, Math.PI * 2, false)
const shape4 = new THREE.Shape()
shape4.arc(6, 1, 1, 0, Math.PI * 2, false)
const shape5 = new THREE.Shape()
shape5.arc(8, 1, 1, 0, Math.PI * 2, false)
const shape6 = new THREE.Shape()
shape6.arc(7, 2.7, 1, 0, Math.PI * 2, false)
const geo = new THREE.ExtrudeGeometry([shape1, shape2, shape3, shape4, shape5, shape6],{
depth:10,
bevelEnabled:false
});
const mesh = new THREE.Mesh(geo, new MeshLambertMaterial({ color: 'red', wireframe: false, side: THREE.DoubleSide }))
addObjectToScene([mesh]);
|

扫描成型,不能定义距离,但是要指定扫描的轨迹
1
2
3
4
5
6
7
8
9
10
11
12
13
| const shape = new THREE.Shape()
shape.arc(0, 0, 1, 0, Math.PI * 2, false)
const curve1 = new THREE.CatmullRomCurve3([
new THREE.Vector3(0, 0, 0),
new THREE.Vector3(5, 5, 8),
], false)
const geo = new THREE.ExtrudeGeometry([shape], {
extrudePath: curve1,
bevelEnabled: false
});
const mesh = new THREE.Mesh(geo, new MeshLambertMaterial({ color: 'red', wireframe: false, side: THREE.DoubleSide }))
addObjectToScene([mesh]);
|
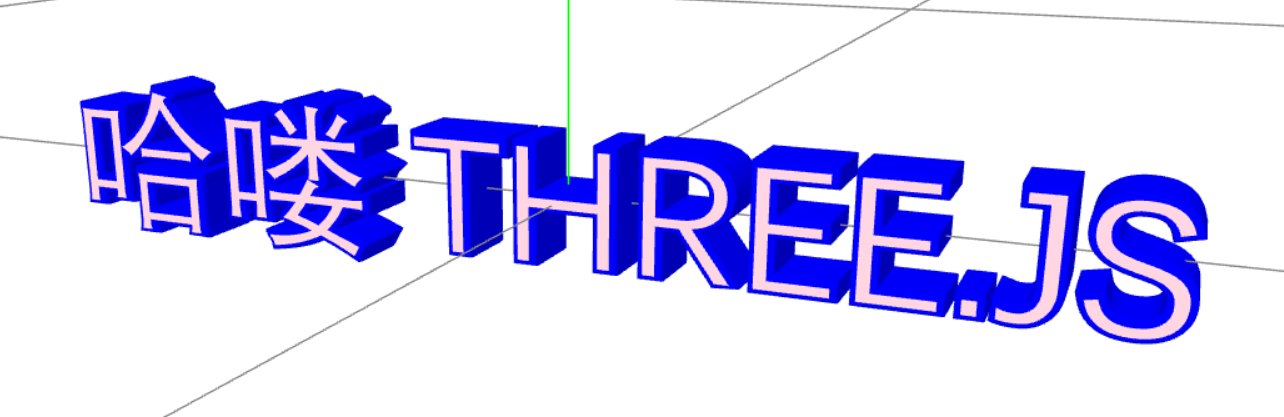
绘制3d文字
1
2
3
4
5
6
7
8
9
10
11
12
13
14
15
16
17
18
19
20
21
22
23
24
25
26
27
28
29
30
31
32
33
34
35
36
37
38
39
40
41
|
import { FontLoader } from 'three/examples/jsm/loaders/FontLoader'
import { TextGeometry } from 'three/examples/jsm/geometries/TextGeometry'
{
const fontLoader = new FontLoader();
const font = await fontLoader.loadAsync('fonts/DengXian_Regular.json')
const geo = new TextGeometry('哈喽 THREE.JS', {
font: font,
size: 0.2,
height: 0.1,
curveSegments: 10,
bevelEnabled:true,
bevelThickness:0.01,
bevelSize:0.01,
})
geo.center()
const mesh = new THREE.Mesh(geo,
[
new THREE.MeshLambertMaterial({ color: 'pink' }),
new THREE.MeshLambertMaterial({ color: 'red' }),
])
addObjectToScene([mesh])
}
|
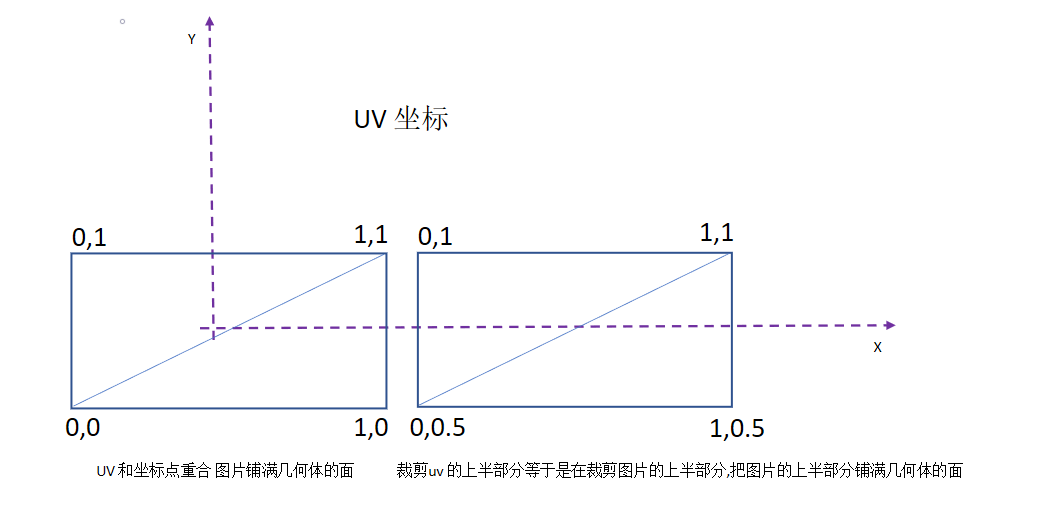
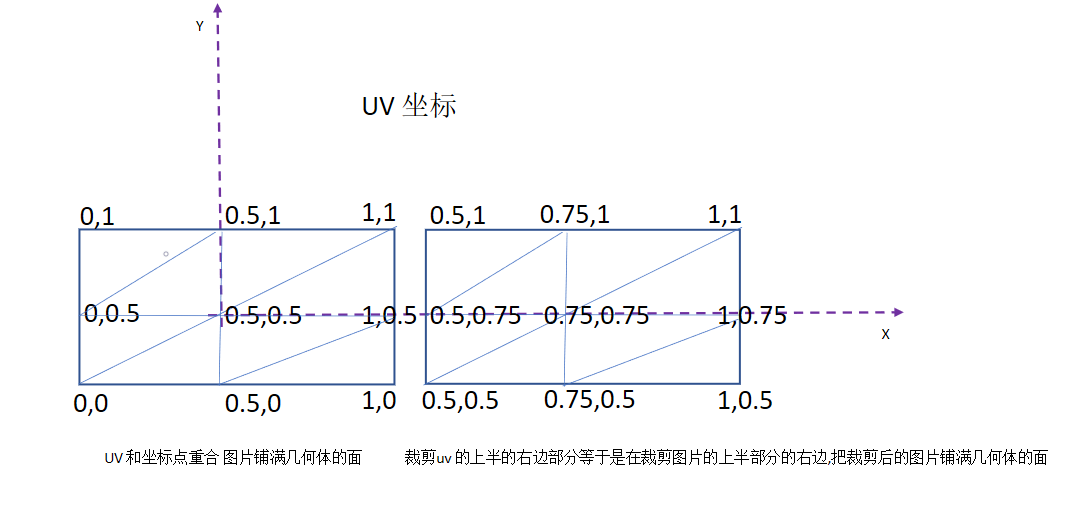
纹理贴图
纹理贴图表达的是图片和几何体的面坐标之间的映射关系
uvz坐标填写的顺序一定要和坐标点的顺序能对应,才能正确的映射
默认 uv 的左下角是0,0 右上角是1,1
裁剪图片一半
1
2
3
4
5
6
7
8
9
10
11
12
13
14
15
16
17
18
19
20
21
22
23
24
25
26
27
28
29
30
31
32
33
34
35
36
37
38
39
40
41
42
43
44
45
46
47
48
49
50
51
52
53
54
55
56
57
58
59
60
61
| const ax = new THREE.AxesHelper(5)
{
const geo = new THREE.PlaneGeometry(1, 1);
console.dir((((geo.getAttribute('uv') as THREE.Float32BufferAttribute).array) as Float32Array))
const newPoints = new Float32Array([
0, 1,
1, 1,
0, 0.5,
1, 0.5
]);
geo.setAttribute('uv', new THREE.BufferAttribute(newPoints, 2))
console.dir((((geo.getAttribute('uv') as THREE.Float32BufferAttribute).array) as Float32Array))
const textureLoader = new THREE.TextureLoader()
textureLoader.load(flower, (texture) => {
const materia = new THREE.MeshLambertMaterial({
side: THREE.DoubleSide,
map: texture,
wireframe: false
})
const mesh = new THREE.Mesh(geo, materia)
mesh.translateX(1.1)
mesh.add(ax)
addObjectToScene([mesh]);
})
}
{
const geo = new THREE.PlaneGeometry(1, 1);
const textureLoader = new THREE.TextureLoader()
textureLoader.load(flower, (texture) => {
const materia = new THREE.MeshLambertMaterial({
side: THREE.DoubleSide,
map: texture,
wireframe: false
})
const mesh = new THREE.Mesh(geo, materia)
mesh.add(ax)
addObjectToScene([mesh]);
})
}
|
UV坐标裁剪的效果
三角面uv
1
2
3
4
5
6
7
8
9
10
11
12
13
14
15
16
17
18
| const shape=new THREE.Shape()
shape.moveTo(0,0)
shape.lineTo(1,0)
shape.lineTo(0.5,1)
const textureLoader = new THREE.TextureLoader()
textureLoader.load(flower,t=>{
const geo=new THREE.ShapeGeometry(shape)
const mesh=new THREE.Mesh(geo,new THREE.MeshLambertMaterial({
side:THREE.DoubleSide,
map:t
}))
console.table((((geo.getAttribute('uv') as THREE.Float32BufferAttribute).array) as Float32Array))
addObjectToScene([mesh]);
})
|
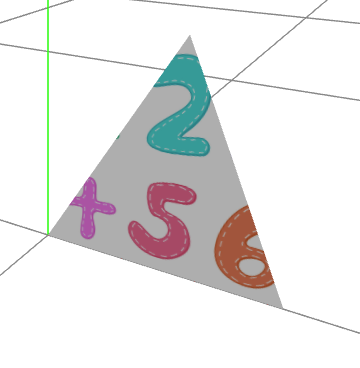
裁剪后的面积减少了,但是 uv 坐标的个数不能减少
1
2
3
4
5
6
7
8
9
10
11
12
13
14
15
16
17
18
19
20
21
22
23
24
25
26
27
28
29
30
31
32
33
34
35
36
37
38
39
40
41
42
43
44
45
46
47
48
49
50
51
52
53
54
55
56
57
58
59
60
61
62
63
| const ax = new THREE.AxesHelper(5)
{
const geo = new THREE.PlaneGeometry(1, 1, 2, 2);
console.table((((geo.getAttribute('uv') as THREE.Float32BufferAttribute).array) as Float32Array))
console.table((((geo.getAttribute('position') as THREE.Float32BufferAttribute).array) as Float32Array))
const newPoints = new Float32Array([
0.5, 1,
0.75, 1,
1, 1,
0.5, 0.75,
0.75, 0.75,
1, 0.75,
0.5, 0.5,
0.75, 0.5,
1, 0.5,
]);
geo.setAttribute('uv', new THREE.BufferAttribute(newPoints, 2))
console.table((((geo.getAttribute('uv') as THREE.Float32BufferAttribute).array) as Float32Array))
const textureLoader = new THREE.TextureLoader()
textureLoader.load(flower, (texture) => {
const materia = new THREE.MeshLambertMaterial({
side: THREE.DoubleSide,
map: texture,
wireframe: false
})
const mesh = new THREE.Mesh(geo, materia)
mesh.translateX(1.1)
mesh.add(ax)
addObjectToScene([mesh]);
})
}
{
const geo = new THREE.PlaneGeometry(1, 1);
const textureLoader = new THREE.TextureLoader()
textureLoader.load(flower, (texture) => {
const materia = new THREE.MeshLambertMaterial({
side: THREE.DoubleSide,
map: texture,
wireframe: false
})
const mesh = new THREE.Mesh(geo, materia)
mesh.add(ax)
addObjectToScene([mesh]);
})
}
|
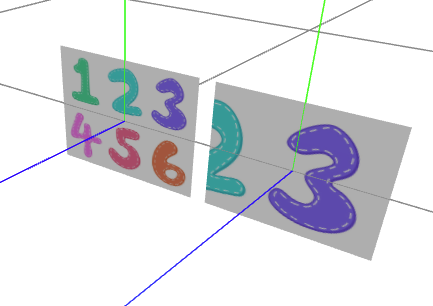
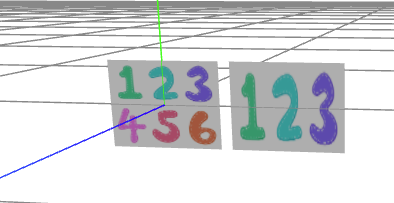
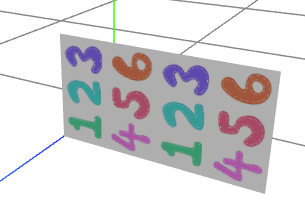
自定义几何体的纹理贴图
自定义几何体要确保法线和坐标数和顶点坐标数数量匹配
1
2
3
4
5
6
7
8
9
10
11
12
13
14
15
16
17
18
19
20
21
22
23
24
25
26
27
28
29
30
31
32
33
34
35
36
37
38
39
40
41
42
43
44
45
46
47
48
49
50
51
52
53
54
55
56
57
58
59
| const pointArr = new Float32Array([
0, 0, 1,
1, 0, 1,
1, 1, 1,
0, 1, 1,
1, 0, 1,
2, 0, 1,
2, 1, 1,
1, 1, 1,
]);
const indexArr = new Uint8Array([
0, 1, 2,
2, 3, 0,
4, 5, 6,
6, 7, 4
]);
const uv = new Float32Array([
0, 0, 1, 0, 1, 1, 0, 1,
0, 0, 1, 0, 1, 1, 0, 1,
])
const rectangle = new THREE.BufferGeometry();
rectangle.setAttribute('position', new THREE.Float32BufferAttribute(pointArr, 3));
rectangle.index = new THREE.BufferAttribute(indexArr, 1)
rectangle.computeVertexNormals()
rectangle.setAttribute('uv', new THREE.Float32BufferAttribute(uv, 2))
rectangle.rotateX(-Math.PI*0.25)
const textureLoader = new THREE.TextureLoader()
textureLoader.load(flower, t => {
const material = new THREE.MeshLambertMaterial({
side: THREE.DoubleSide,
wireframe: false,
map: t,
});
console.table(rectangle.getAttribute('normal'));
const obj = new THREE.Mesh(rectangle, material)
const axesHelper = new THREE.AxesHelper(3)
obj.add(axesHelper)
addObjectToScene([obj]);
})
|
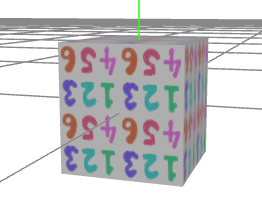
数组材质
几何体可以赋予数组材质,如果材质是数组形式提供,数组的个数少于几何体的面,则几何体有面不会渲染
1
2
3
4
5
6
7
8
9
10
11
12
13
14
15
16
17
18
19
20
21
22
23
24
25
26
27
28
29
30
31
32
33
34
35
36
37
38
39
| const geo = new THREE.BoxGeometry(1, 1, 1)
const textureLoader = new THREE.TextureLoader()
const texture1 = textureLoader.load(dice1)
const texture2 = textureLoader.load(dice2)
const texture3 = textureLoader.load(dice3)
const texture4 = textureLoader.load(dice4)
const texture5 = textureLoader.load(dice5)
const texture6 = textureLoader.load(dice6)
const materia1 = new THREE.MeshLambertMaterial({
map: texture1,
side: THREE.DoubleSide,
})
const materia2 = new THREE.MeshLambertMaterial({
map: texture2,
side: THREE.DoubleSide,
})
const materia3 = new THREE.MeshLambertMaterial({
map: texture3,
side: THREE.DoubleSide,
})
const materia4 = new THREE.MeshLambertMaterial({
map: texture4,
side: THREE.DoubleSide,
})
const materia5 = new THREE.MeshLambertMaterial({
map: texture5,
side: THREE.DoubleSide,
})
const materia6 = new THREE.MeshLambertMaterial({
map: texture6,
side: THREE.DoubleSide,
})
const mesh = new THREE.Mesh(geo, [materia1, materia2, materia3, materia4, materia5, materia6])
addObjectToScene([mesh])
|

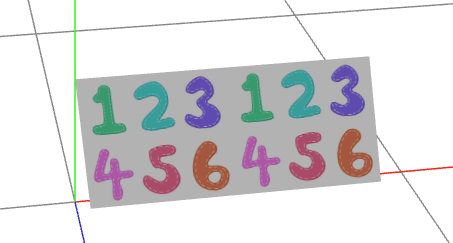
纹理阵列
wrapS
纹理在水平方向上纹理包裹方式,在UV映射中对应于U,默认THREE.ClampToEdgeWrapping,表示纹理边缘与网格的边缘贴合。中间部分等比缩放。还可以设置为:THREE.RepeatWrapping(重复平铺) 和 THREE.MirroredRepeatWrapping(先镜像再重复平铺)
wrapT
纹理贴图在垂直方向上的包裹方式,在UV映射中对应于V,默认也是THREE.ClampToEdgeWrapping,与wrapS属性一样也可以设置为:THREE.RepeatWrapping(重复平铺) 和 THREE.MirroredRepeatWrapping(先镜像再重复平铺)
repeat
用来设置纹理将在表面上,分别在U、V方向重复多少次。
repeat属性是Vector2类型,可以使用如下语句来为它赋值
this.cube.material.map.repeat.set(repeatX, repeatY)
repeatX 用来指定在x轴方向上多久重复一次,repeatY用来指定在y轴方向上多久重复一次
这两个变量取值范围与对应效果如下
如果设置等于1,则纹理不会重复
如果设置为 大于0小于1 的值,纹理会被放大
如果设置为 小于0 的值,那么会产生纹理的镜像
如果设置为 大于1 的值,纹理会重复平铺
1
2
3
4
5
6
7
8
9
10
11
12
13
14
15
16
17
| const geo = new THREE.BoxGeometry(1, 1, 1)
const textureLoader = new THREE.TextureLoader()
const texture1 = textureLoader.load(flower)
texture1.wrapS = THREE.RepeatWrapping;
texture1.wrapT = THREE.RepeatWrapping;
texture1.repeat.set(-2, -2);
const materia = new THREE.MeshLambertMaterial({
map: texture1,
side: THREE.DoubleSide,
})
const mesh = new THREE.Mesh(geo, materia)
addObjectToScene([mesh])
|
纹理偏移
texture.offset.set(x, y) x和y 的范围-1到1
1
2
3
4
5
6
7
8
9
10
11
12
13
14
15
16
17
18
19
20
21
22
23
24
25
26
27
28
29
30
31
32
33
34
35
36
37
38
39
40
41
42
43
44
45
46
47
48
49
50
51
52
53
54
55
56
57
58
59
60
61
62
63
64
65
66
67
68
69
70
71
72
73
74
| const pointArr = new Float32Array([
0, 0, 1,
1, 0, 1,
1, 1, 1,
0, 1, 1,
1, 0, 1,
2, 0, 1,
2, 1, 1,
1, 1, 1,
]);
const indexArr = new Uint8Array([
0, 1, 2,
2, 3, 0,
4, 5, 6,
6, 7, 4
]);
const uv = new Float32Array([
0, 0, 1, 0, 1, 1, 0, 1,
0, 0, 1, 0, 1, 1, 0, 1,
])
const rectangle = new THREE.BufferGeometry();
rectangle.setAttribute('position', new THREE.Float32BufferAttribute(pointArr, 3));
rectangle.index = new THREE.BufferAttribute(indexArr, 1)
rectangle.computeVertexNormals()
rectangle.setAttribute('uv', new THREE.Float32BufferAttribute(uv, 2))
const textureLoader = new THREE.TextureLoader()
textureLoader.load(flower, t => {
t.offset.set(0, 0)
const material = new THREE.MeshLambertMaterial({
side: THREE.DoubleSide,
wireframe: false,
map: t,
});
const obj = new THREE.Mesh(rectangle, material)
const axesHelper = new THREE.AxesHelper(3)
obj.add(axesHelper)
addObjectToScene([obj]);
configPrimaryAnimation(new Map<string, Function>([
["a1", () => {
if (obj.material.map) {
const tmp = obj.material.map.offset.x
if (tmp <=-1) {
obj.material.map.offset.setX(0)
}else{
obj.material.map.offset.setX((-0.02)+tmp)
}
}
}]
]))
})
|
纹理旋转
1
2
3
4
|
texture.rotation = Math.PI * 0.5
texture.center.set(0.5, 0.5)
|
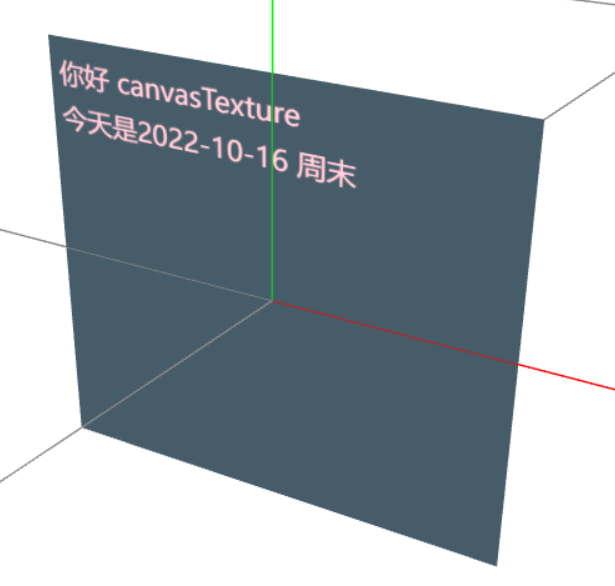
canvas 作为纹理
1
2
3
4
5
6
7
8
9
10
11
12
13
14
15
16
17
18
19
20
21
22
| const geo = new THREE.PlaneGeometry(1, 1)
const canvas = document.createElement('canvas')
canvas.width=500;
canvas.height=500;
const ctx= canvas.getContext('2d');
if(ctx){
ctx.fillStyle='#3F535E'
ctx.fillRect(0,0,500,500)
ctx.fillStyle='pink'
ctx.font='30px solid'
ctx.fillText('你好 canvasTexture',10,50);
ctx.fillText('今天是2022-10-16 周末',10,100);
}
const canvasTexture = new THREE.CanvasTexture(canvas)
const mesh = new THREE.Mesh(geo, new MeshLambertMaterial({
map: canvasTexture,
side:THREE.DoubleSide,
}))
addObjectToScene([mesh])
|
视频作为纹理
视频作为纹理的不方便支持在于浏览器不允许带声音的自动播放
1
2
3
4
5
6
7
8
9
10
11
12
13
14
15
16
17
18
19
20
21
22
23
24
25
26
27
28
29
30
|
const video = document.createElement('video') as HTMLVideoElement
video.autoplay = true
video.muted = true
video.loop = true
video.id = "video"
const source = document.createElement('source') as HTMLSourceElement
source.src = require('./static/movie.mp4')
source.type = 'video/mp4'
video.appendChild(source)
window.addEventListener('load', (e) => {
video.play()
})
const texture = new THREE.VideoTexture(video)
texture.wrapS = texture.wrapT = THREE.ClampToEdgeWrapping;
texture.minFilter = THREE.LinearFilter;
const geometry = new THREE.PlaneGeometry(4,4);
geometry.translate(2,2,0)
const material = new THREE.MeshPhongMaterial({
map: texture,
side: THREE.DoubleSide
});
const mesh = new THREE.Mesh(geometry, material);
addObjectToScene([mesh])
|
凹凸贴图 ,法线贴图
法线贴图是凹凸贴图的一种
在3D计算机图形学中,法线贴图是一种用于伪造凹凸光照的技术,是凹凸贴图的一种实现。它用于添加细节,
而不使用更多的多边形。这种技术的一个常见用途是,通过从高精度多边形或高度图生成法线贴图,来极大地增强低精度多边形的外观和细节
帧动画
Threejs提供了一系列用户编辑和播放关键帧动画的API,例如关键帧KeyframeTrack、剪辑AnimationClip、操作AnimationAction、混合器AnimationMixer
- AnimationMixer
作为特定对象的动画混合器,可以管理该对象的所有动画
- AnimationAction
为播放器指定对应的片段存储一系列行为,用来指定动画快慢,循环类型等
- AnimationClip
表示可重用的动画行为片段,用来指定一个动画的动画效果(放大缩小、上下移动等)
- KeyframeTrack
与时间相关的帧序列,传入时间和值,应用在指定对象的属性上。目前有 BooleanKeyframeTrack VectorKeyframeTrack 等。
自绘模型动画帧
1
2
3
4
5
6
7
8
9
10
11
12
13
14
15
16
17
18
19
20
21
22
23
24
25
26
27
28
29
30
31
32
33
34
35
36
37
38
39
40
41
42
43
44
45
46
47
48
49
50
51
52
53
54
55
56
57
58
59
60
61
62
63
64
65
66
| const box = new THREE.BoxGeometry(1, 1, 1)
const sphere = new THREE.SphereGeometry(0.5)
const materia = new THREE.MeshLambertMaterial({ color: 'pink' })
const boxMesh = new THREE.Mesh(box, materia)
boxMesh.name = 'box';
const sphereMesh = new THREE.Mesh(sphere, materia.clone())
sphereMesh.name = 'sphere'
sphereMesh.translateX(1)
const group = new THREE.Group()
group.name = 'myGroup'
group.add(boxMesh)
group.add(sphereMesh)
const times = [0, 10];
const values = [1, 0, 0, 5, 0, 0];
const posTrack = new THREE.KeyframeTrack('sphere.position', times, values);
const colorKF = new THREE.KeyframeTrack('sphere.material.color', [3, 10],
[0.5, 0.5, 0, 0.5, 0.5, 1])
const scaleTrack = new THREE.KeyframeTrack('box.scale', [0, 3], [1, 1, 1, 2, 2, 2]);
const duration = 10;
const clip = new THREE.AnimationClip("default", duration, [posTrack, colorKF, scaleTrack]);
const mixer = new THREE.AnimationMixer(group);
const animationAction = mixer.clipAction(clip);
animationAction.timeScale = 5;
animationAction.loop = THREE.LoopOnce;
animationAction.clampWhenFinished = true;
animationAction.play();
const btn= document.querySelector('#pauseBtn')
btn?.addEventListener('click',()=>{
animationAction.paused= !animationAction.paused
})
addObjectToScene([group])
configPrimaryAnimation(new Map<string, Function>([
["a1", () => {
clock.current && mixer.update(clock.current.getDelta());
}]
]))
|
外部模型动画帧
变形动画
几何体的顶点的位置坐标发生变化,从一个状态过渡到另一个状态自然就产生了变形动画
微信跳一跳小游戏就是变形动画
1
2
3
4
5
6
7
8
9
10
11
12
13
14
15
16
17
18
19
20
21
22
23
24
25
26
27
28
29
30
31
32
33
34
35
36
37
38
39
40
41
42
43
| var geometry = new THREE.BoxGeometry(5, 5, 5);
var box1 = new THREE.BoxGeometry(6, 3, 6);
var box2 = new THREE.BoxGeometry(4, 10, 4);
geometry.morphAttributes.position = [];
geometry.morphAttributes.position[0] = new THREE.Float32BufferAttribute(box1.getAttribute('position').array, 3);
geometry.morphAttributes.position[1] = new THREE.Float32BufferAttribute(box2.getAttribute('position').array, 3);
var material = new THREE.MeshLambertMaterial({
color: 'red'
});
var mesh = new THREE.Mesh(geometry, material);
mesh.morphTargetInfluences && (mesh.morphTargetInfluences[0] = 1);
mesh.morphTargetInfluences && (mesh.morphTargetInfluences[1] = 0);
const Track1 = new THREE.KeyframeTrack('.morphTargetInfluences[0]', [0, 10, 20], [0, 1, 0]);
const Track2 = new THREE.KeyframeTrack('.morphTargetInfluences[1]', [20, 30, 40], [0, 1, 0]);
const clip = new THREE.AnimationClip("default", 40, [Track1, Track2]);
const mixer = new THREE.AnimationMixer(mesh);
const AnimationAction = mixer.clipAction(clip);
AnimationAction.timeScale = 5;
AnimationAction.clampWhenFinished = true;
AnimationAction.play();
configPrimaryAnimation(new Map<string, Function>([
["a1", () => {
clock.current && mixer.update(clock.current.getDelta());
}]
]))
addObjectToScene([mesh])
|
使用外部模型
大部分情况下对于复杂的模型,都是采用3D 软件设计模型导入到 THREE.js 进行交互
常用的外部模型:obj, fbx, gltf
主流的是 gltf(GL TransmissionFormat),即图形语言交换格式,它是一种3D内容的格式标准,由 Khronos Group管理
(Khronos Group还管理着OpenGL系列、OpenCL等重要的行业标准)
glTF的设计是面向实时渲染应用的,尽量提供可以直接传输给图形API的数据形式,不再需要二次转换;
glTF对OpenGL ES、WebGL非常友好,glTF的目标是:3D领域的JPEG;
GLTF具体的数据存储格式可以去官方网站上看:https://www.khronos.org/gltf/,使用 json 描述模型的结构
gltf 常用的格式:
- 用二进制格式(.glb),通常较小且独立,但不易编辑
- 嵌入式格式(.gltf), 其他模型利用转换工具也可以转成 .gltf 格式,基于json的文本文件
- 分离式的
如果不想使用THREE.JS 渲染 可以直接显示一个模型在网页里,还是伟大的谷歌公司开源的组件 model-viewer
谷歌公司开源的一个 JS 项目: model-viewer
项目 Github 地址:https://github.com/google/model-viewer
项目官网:https://modelviewer.dev/
项目介绍:Easily display interactive 3D models on the web & in AR
简单来说就是:在 Web 或 AR 中,一个简单的用来显示 3D 模型的 JS 库。
1
2
3
4
5
6
7
8
9
10
11
12
13
14
15
16
17
18
| import { GLTFLoader } from 'three/examples/jsm/loaders/GLTFLoader'
const loader = new GLTFLoader()
loader.load('models/untitled.gltf', gltf => {
gltf.scene.traverse(p=>{
if(p.type==='Mesh'){
const mesh= p as THREE.Mesh;
const material= mesh.material as THREE.MeshStandardMaterial
material.color=new THREE.Color('pink')
}
})
gltf.scene.translateX(2)
addObjectToScene([gltf.scene])
}, undefined, error => {
console.log(error.message)
})
|
精灵模型和粒子系统
精灵模型对象Sprite。精灵模型对象和网格模型一样需要设置材质,不过精灵模型不需要程序员设置几何体,Threejs系统渲染的时候会自动设置。
通过Threejs精灵模型可以给场景中模型对象设置标签,也快成大量精灵模型对象模拟一个粒子系统,实现下雨或下雪的渲染效果
它的特性是,永远正对相机平面。不像广告牌,可以绕到后面看看,绕到侧面看看,它永远会正对着你。所以我们可以用它来显示一些标签,比如在可视化监控系统中,就可以显示传感器的数据,
模拟下雨
1
2
3
4
5
6
7
8
9
10
11
12
13
14
15
16
17
18
19
20
21
22
23
24
25
26
27
28
29
30
31
32
33
34
35
36
37
38
39
40
| const texture = new THREE.TextureLoader().load(rain);
const spriteMaterial = new THREE.SpriteMaterial({
color: 0xffffff,
map: texture,
});
const sprite = new THREE.Sprite(spriteMaterial);
sprite.scale.set(1, 1, 0)
const group = new THREE.Group()
for (let index = 0; index < 800; index++) {
const clone = sprite.clone()
clone.position.set(100 * (Math.random()-0.5), 30 * (Math.random()), 100 * (Math.random()-0.6))
clone.rotateX(Math.PI * Math.random())
clone.rotateY(Math.PI * Math.random())
clone.rotateZ(Math.PI * Math.random())
group.add(clone)
}
const grasslandTextureLoader=new THREE.TextureLoader();
const grasslandTexture= grasslandTextureLoader.load(grassland)
const planeGeometry=new THREE.PlaneGeometry(120,120)
const plan=new THREE.Mesh(planeGeometry,new THREE.MeshLambertMaterial({map:grasslandTexture}))
plan.rotateX(-Math.PI*0.5)
plan.position.set(0,1,0)
addObjectToScene([group,plan]);
configPrimaryAnimation(new Map<string, Function>([
["a1", () => {
group.children.forEach(p => {
if (p.position.y < -1) {
p.position.y =30
}
p.position.y -= 0.2;
})
}]
]))
|
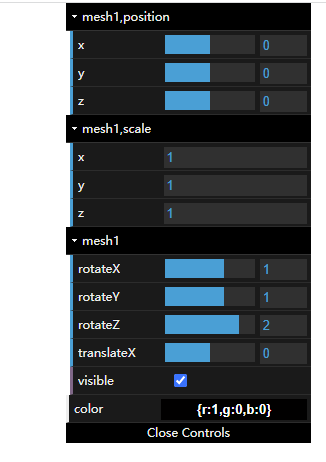
dat.gui 工具的使用
Google Data Arts Team 开源一款插件,three.js 发起人参与此开源项目,此工具最大优势就是可插拨的加入项目,由于改变对象的属性
官方文档https://github.com/dataarts/dat.gui/blob/master/API.md
在这个开源工具的基础有有基于react 开发的其他工具
GUI 会根据你设置的属性类型来渲染不同的控件
- 如果是Number 类型则用 slider来控制
- 如果是 Boolean 类型,则用 Checkbox来控制
- 如果是 Function 类型则用 button 来控制
- 如果是 String 类型则用 input 来控制
1
2
3
4
5
6
7
8
9
| gui.add(text, 'noiseStrength').step(5);
gui.add(text, 'growthSpeed', -5, 5);
gui.add(text, 'maxSize').min(0).step(0.25);
gui.add(text, 'message', [ 'pizza', 'chrome', 'hooray' ] );
gui.add(text, 'speed', { Stopped: 0, Slow: 0.1, Fast: 5 } );
|
为了方便使用进行封装,见 hooks